









Updated 2 months ago
Foot Tread Design on Garden Shovels and Spades: What Buyers Should Inspect
SCARECROW GARDEN SUPPLIER

garden shovel foot tread design and inspection
The foot tread is where the user’s body meets the tool. It is a small piece of metal — a fold, a step, a platform — but it carries the full weight of a person driving a blade into the ground. When it is designed well, the user does not think about it. When it is designed poorly, the user thinks about it every time they step on the shovel — and eventually, they return the tool.
For B2B buyers, the foot tread is easy to overlook. It does not appear on most spec sheets. It is not the first thing you see when you pick up a sample. But it is one of the first things the end user notices, and it is a common source of complaints: “uncomfortable to use,” “hurts my foot,” “bent after one season.”
This guide breaks down what a foot tread is, what makes one tread design better than another, and what a buyer should inspect on a sample before committing to a bulk order.
Why the Foot Tread Matters in Real Use
The foot tread — also called the step, the platform, or the lapel — is the flat or folded area at the top of the blade where the user places their foot to push the blade into the soil. On both shovels and spades, this is the primary force input point. The user’s body weight is applied here, transferring force through the blade into the ground.
A well-designed tread does three things:
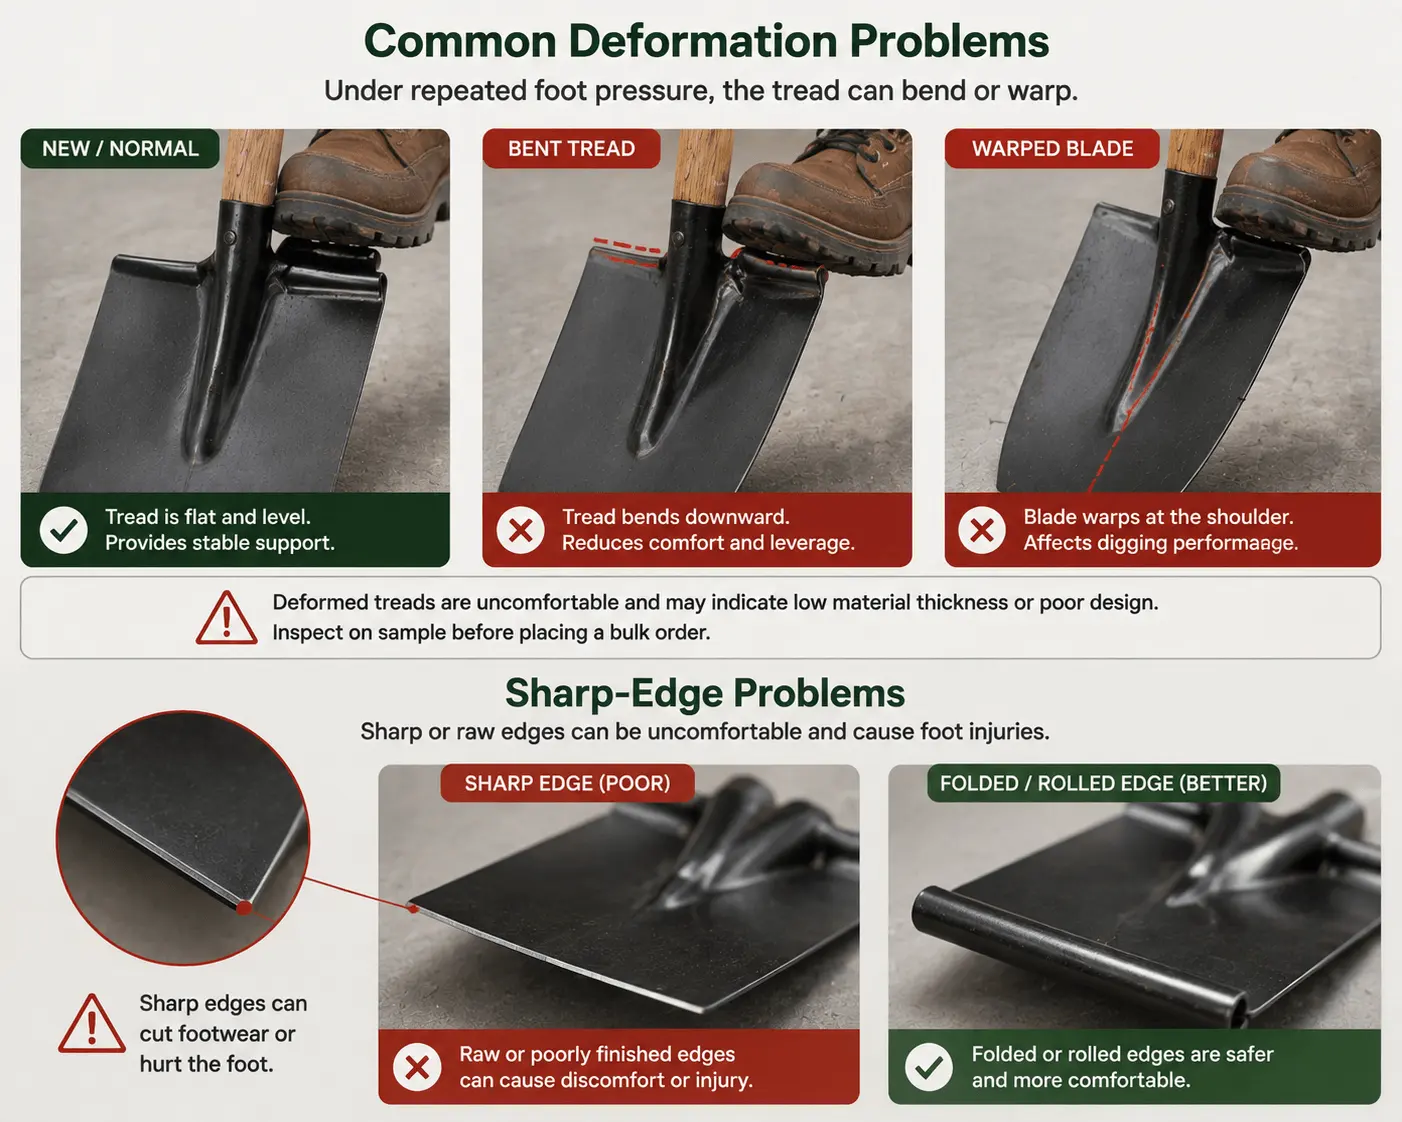
Distributes pressure. The user’s foot pushes down with full body weight. A wider tread may spread that pressure across more of the foot. A narrow tread concentrates it on a smaller area — which may be fine for light soil but uncomfortable in hard ground.
Edge comfort. Sharp or raw-cut edges may be uncomfortable when the user steps on the tread in soft-soled shoes. Folded or rolled edges are generally more comfortable.
Resists deformation. Under repeated foot pressure — especially in professional or agricultural use — the tread can bend, warp, or deform. A reinforced tread may hold its shape better.
A poorly designed tread fails in two ways: it is uncomfortable (a user complaint), or it deforms (a structural failure that affects the entire blade). Both lead to returns.
Tread Width, Edge Shape and Foot Contact Area
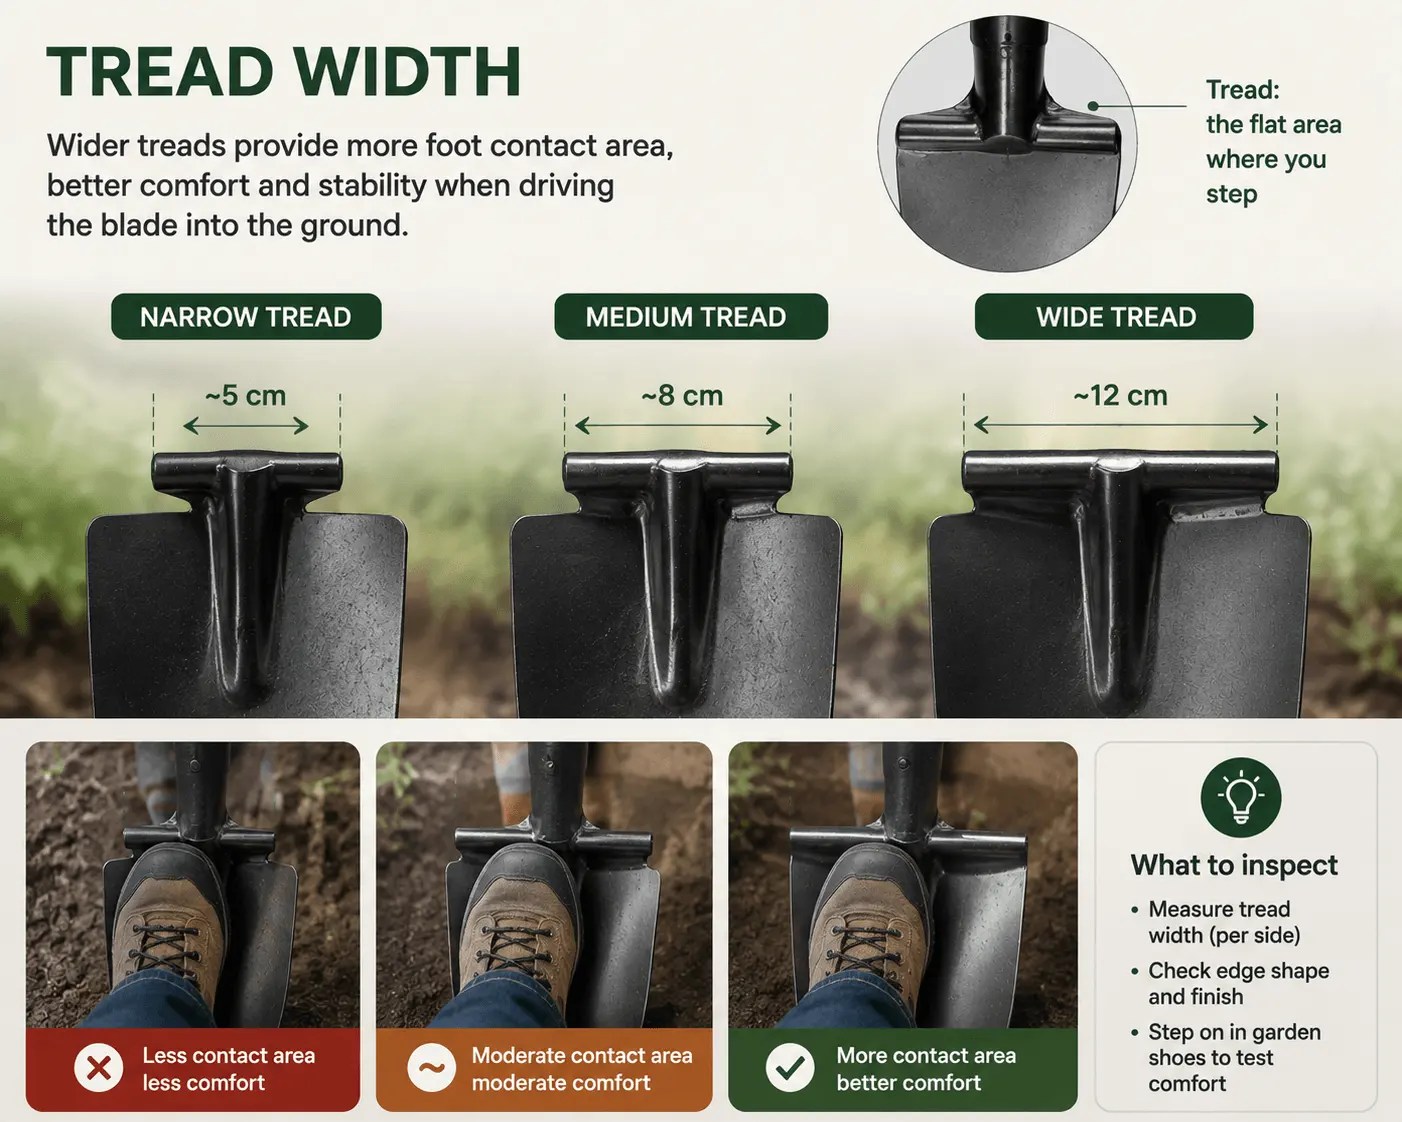
Tread Width
The tread width determines how much of the user’s foot makes contact with the tool. This is a comfort and usability specification, not just a dimension. Measure the tread width on your sample and compare against your target or reference product. Do not assume universal width classifications — actual widths vary by manufacturer and model.
Edge Shape
The edge of the tread is where comfort is won or lost. The user steps on the tread in whatever shoes they happen to be wearing — work boots, garden clogs, soft-soled shoes. Sharp edges may cause discomfort; folded or rolled edges are generally more comfortable. However, the actual comfort depends on blade thickness, material, forming quality, and the user’s footwear — evaluate on sample.
| Edge Type | Description | What to Check |
| Sharp / raw cut | The tread edge is the raw cut of the stamped metal | May be uncomfortable in soft-soled shoes; check on sample |
| Folded / hemmed | The edge is folded back under itself, creating a rounded surface | Generally more comfortable; verify fold quality on sample |
| Rolled | The edge is rolled into a curved profile | May distribute pressure more smoothly; verify on sample |
| Padded / coated | A rubber or plastic cover is added over the edge | May add comfort; check durability on sample |
Foot Contact Area
The total contact area is the sum of both tread sides (left and right). A tread with two wide, rolled-edge sides provides the most contact area and the most comfort. A tread with two narrow, sharp-edge sides provides the least.
To check on a sample: place your foot on the tread in a garden shoe (not a work boot — the end user may not wear work boots). Step down with moderate pressure. Note where the pressure concentrates. If you feel the edge through the shoe, the end user will too.
What to specify: Tread width per side, edge type (folded/rolled/sharp), and total contact area.
What to verify on a sample: Step on the tread in garden shoes. Feel for sharp edges. Measure the tread width. Photograph the edge profile from the end of the blade.
Comparing Shovel Tread Designs?
Check tread width, edge condition, reinforcement and alignment on the actual sample. Compare measurable construction details before deciding which shovel specification is suitable for your range.
Single-Layer vs Reinforced Tread Structures
Single-Layer Tread
A single-layer tread is stamped from the same sheet of metal as the blade. The tread is simply a fold or extension of the blade material — no additional reinforcement. It is the simplest and cheapest tread design.
Failure mode: Under heavy or repeated foot pressure, a single-layer tread can deform. The tread bends downward, the blade warps at the shoulder, and the tool becomes difficult to use. This is most common in hard soil (clay, compacted earth) where the user applies maximum foot pressure.
Reinforced Tread
A reinforced tread has additional material or structure that stiffens the step area. Common reinforcement methods:
- Folded lapel. The tread is folded back on itself, doubling the metal thickness at the step area. A patent for a round-point shovel documented this design. The presence of this design in patent literature shows it has been proposed — verify actual performance on sample.
- Welded reinforcement. An additional piece of metal is welded to the underside of the tread, thickening the step area.
- Thicker shoulder. The blade material at the shoulder (where the tread meets the socket) is thicker than the rest of the blade, providing more resistance to bending at the stress point.
| Tread Structure | Resistance to Deformation | Cost | What to Evaluate |
| Single-layer | May bend under heavy use | Lowest | Confirm on sample against target use |
| Folded lapel | May resist bending better than single-layer | Medium | Confirm on sample |
| Welded reinforcement | May resist bending well | Higher | Confirm on sample |
| Thicker shoulder | May resist bending at junction | Higher | Confirm on sample |
To check on a sample: look at the tread from the end of the blade. If the tread is a simple fold of the same thickness as the blade, it is single-layer. If the tread appears thicker at the step area — either folded back on itself or with visible additional material — it is reinforced.
What to specify: Tread structure (single-layer, folded lapel, welded reinforcement, or thicker shoulder) and reinforcement level appropriate to the end user’s soil type and use pattern.
What to verify on a sample: Look at the tread cross-section from the blade end. Check for double thickness or additional material. Press down on the tread with your thumb — this is an informal screening check, not a durability test. Record your observations and compare against the approved reference.
Tread Alignment With Blade and Shaft
Alignment is a quality indicator that does not appear on spec sheets — but it is immediately noticeable to the user.
Tread-to-Blade Alignment
The tread alignment should match the approved sample or design reference. If the tread is angled — tilted up or down relative to the blade — the user’s foot may slide off during use, or the blade may enter the ground at an angle. Check alignment against the approved reference for the specific model.
Tread-to-Shaft Alignment
The tread alignment relative to the shaft should also match the approved sample or design reference. A misaligned tread may cause the blade to twist under foot pressure — the user feels this as instability or “wobble.” Check by sighting down the shaft to the blade and comparing against the reference.
Causes of Misalignment
- Tooling wear. The stamping die that forms the tread has worn unevenly, producing treads that are not perpendicular.
- Assembly error. The handle was not seated straight in the socket, causing the entire tool to be misaligned.
- Heat distortion. If the blade is hardened or tempered after the tread is formed, heat treatment can distort the tread alignment.
To check on a sample: sight down the shaft from the grip end to the blade. The tread should be perpendicular to the shaft and parallel to the ground when the tool is held in a natural digging position. If the tread is angled, twisted, or off-center, the production run will have the same issue.
Common Deformation and Sharp-Edge Problems
Tread Deformation
| Problem | Cause | What the User Experiences |
| Tread bends downward | Single-layer tread under heavy foot pressure | The step area is no longer flat; foot slides off |
| Blade warps at shoulder | Tread deformation transmits to the blade | The blade is no longer flat; digging becomes difficult |
| Tread folds completely | Extreme force on underbuilt tread | The tool is unusable; full structural failure |
Sharp-Edge Problems
| Problem | Cause | What the User Experiences |
| Sharp edge cuts foot | Raw cut edge, no folding or rolling | Discomfort or minor injury in soft-soled shoes |
| Edge coating chips | Painted edge wears off under foot contact | Bare metal exposed; corrosion starts; sharp edge develops |
| Folded edge unfolds | Fold was not securely formed in production | The fold opens under pressure, creating a sharp edge |
Risk Alert: Sharp tread edges can contribute to “uncomfortable to use” complaints. A user who steps on a sharp tread edge in garden clogs will notice it — and may return the tool. If your complaint data shows “uncomfortable,” check the tread edge as one possible cause.
Sample Use Test With Work Boots or Garden Shoes
A tread that looks fine in a photograph may feel wrong underfoot. The only way to evaluate tread comfort is to step on it — in the shoes your end user will wear.
Test Protocol
This is an informal screening test — not a durability or safety test. It helps you observe tread comfort and structure under foot pressure.
Wear garden shoes or soft-soled footwear — not work boots. Work boots protect the foot from edge discomfort; the end user may not wear them.
Place the shovel blade on a firm surface — grass, soil, or a rubber mat. Do not test on concrete — it damages the blade and does not simulate real use.
Step on the tread with moderate pressure. Note where the pressure concentrates.
Step on the tread with more pressure. Check for flex in the tread, sharp edges, and foot contact area. (Informal screening — do not apply full body weight if it creates a safety concern.)
Step on both sides — left and right tread. They should feel the same. If one side is sharper or narrower than the other, the tread is inconsistent.
Repeat a few times. A tread that feels fine on the first step but uncomfortable after several steps may have a comfort problem that surfaces in the field. (Informal screening — not a fatigue or durability test.)
Document the test: Photograph your foot on the tread from above and from the side. Note the shoe type. Record any observations about edge comfort, tread flex, or pressure concentration.
Comparing Shovel Tread Designs?
Check tread width, edge condition, reinforcement and alignment on the actual sample. Compare measurable construction details before deciding which shovel specification is suitable for your range.
How to Specify Tread Details in an RFQ
| RFQ Item | What to State |
| Tread width | State target width per side, or “match reference” |
| Edge type | Folded, rolled, or sharp (specify which) |
| Tread structure | Single-layer, folded lapel, welded reinforcement, or thicker shoulder |
| Reinforcement level | Appropriate to end user’s soil type and use pattern |
| Alignment tolerance | Tread perpendicular to shaft and blade; no twist |
| Edge coating | If painted, state that edge must be coated — no bare metal at foot contact area |
Next Step: Specify the Tread Before It Becomes a Complaint
The foot tread is a small part of the shovel, but it is the part the user touches with their body. A tread that is too narrow, too sharp, or too thin to withstand real use will generate complaints — and those complaints will come back to you as the buyer.
Specify the tread width, edge type, reinforcement, and alignment. Test the sample in garden shoes. Photograph the tread from multiple angles. And when the bulk order arrives, pull a sample and check the tread first — because if the tread has changed, the user will notice before you do.
Send us your tread requirements — or a reference product to match — and we can help confirm shovels with the right tread design, coordinate a sample test, and support a specification that keeps the tread consistent across repeat orders, subject to model and factory feasibility.
Ready to Specify the Foot Tread?
Add the approved tread structure and alignment details to the RFQ and controlled specification. Turn the approved sample into clear, measurable requirements that can be followed during quotation, production and repeat orders.
Related Articles
Round Point Shovel Buying Guide for Wholesale Buyers: What to Specify Before Ordering
Garden Spade Buying Guide for Retail and Landscaping Buyers: Blade, Step, Shaft and Use-Case Fit
Common Garden Shovel Complaints in Retail — and How Buyers Can Trace the Root Cause