










Updated 2 months ago
Shovel Socket and Neck Construction: Why Head-to-Handle Connections Fail
SCARECROW GARDEN SUPPLIER

shovel socket and neck construction details
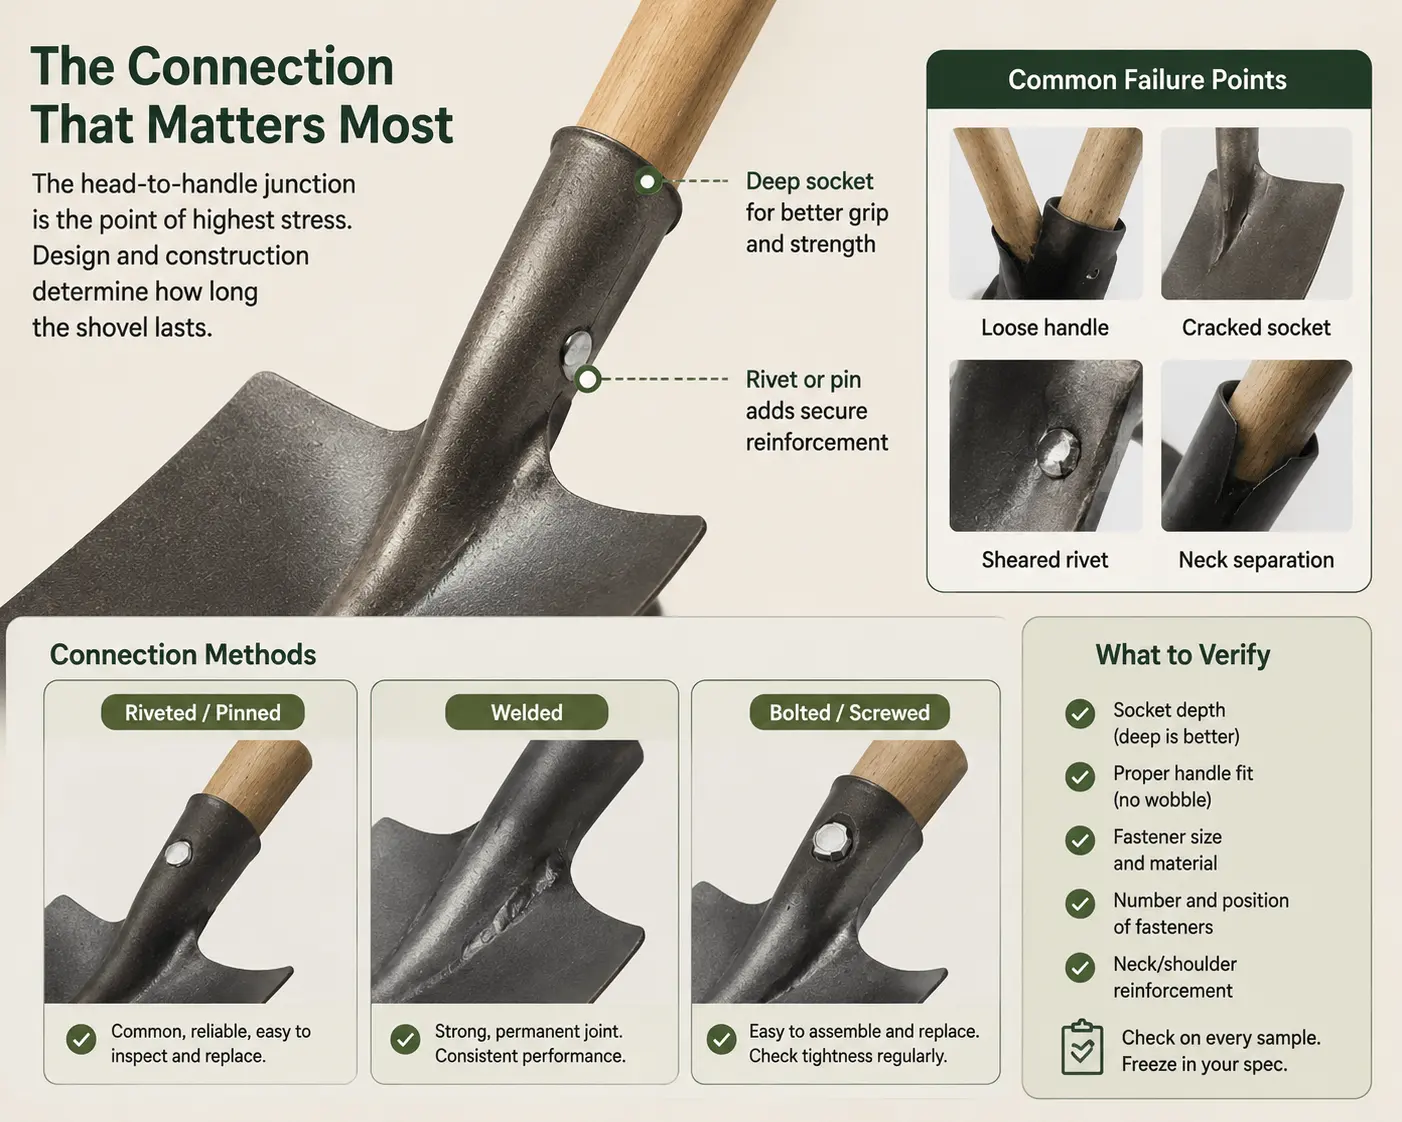
When a customer returns a shovel, the complaint is rarely about the blade. The blade is still sharp, still intact, still functional. In most cases, the complaint is about the connection — the handle has come loose, the socket has cracked, the rivet has sheared, or the neck has separated from the blade.
This is a structural connection issue. The junction where the handle meets the blade is the point of highest stress concentration on the entire tool. Every downward foot pressure, every lifting leverage, every prying motion transmits force through this single junction. And the way that junction is designed — the socket depth, the connection method, the reinforcement — affects how the tool holds up under repeated use.
For B2B buyers, understanding socket and neck construction is not about becoming an engineer. It is about knowing what to specify, what to check on a sample, and what to freeze in a production specification so that the second order matches the first.
Why the Head-to-Handle Junction Is a Critical Failure Point
Consider the forces at work. A user steps on the tread with their full body weight, driving the blade into the ground. Then they pull back on the handle to lever the soil out. The handle acts as a lever; the socket acts as the fulcrum. The force at the socket junction is amplified by the lever arm — the exact magnitude depends on handle length, angle of pull, and user technique.
Over the course of a workday, this motion is repeated many times. Each stroke stresses the same junction. The connection does not necessarily fail because of a single catastrophic load — it can fail through accumulated stress: the rivet loosens, the adhesive degrades, the socket wall cracks, and eventually the handle wobbles.
This is why the socket and neck design matters more than almost any other specification on the tool. A perfectly forged blade with a poorly designed socket is a return waiting to happen.
Socket Depth, Diameter and Fit
Socket Depth
The socket is the sleeve — cylindrical or tapered — where the handle enters the blade. Its depth is one variable in connection strength. Socket depth should be evaluated together with fit, fastener, socket geometry, and material — do not rely on depth alone to judge connection quality.
Record the actual socket depth on your sample and compare it against the approved reference and target use. Do not assume universal depth ranges — actual depths vary by manufacturer and model.
Socket Diameter and Handle Fit
The socket diameter must match the handle diameter. This sounds obvious, but it is one of the most common sources of connection failure:
- Loose fit. The handle is narrower than the socket. The handle wobbles from day one. The fastener takes all the lateral stress. Adhesive or wedge filler may be used to close the gap, but filler degrades over time — especially under heat and moisture cycling.
- Tight fit. The handle matches the socket diameter closely. Friction and surface contact hold the handle in place even before the fastener is installed. The fastener serves as a backup, not the primary structural element.
- Press fit. The handle is slightly oversized relative to the socket and is pressed or driven in. This creates a very tight connection but requires precise manufacturing tolerances — and makes handle replacement more difficult.
To check fit on a sample: hold the blade firmly and twist the handle. Any rotation or wobble means the fit is too loose. This is not something that improves with use — it only gets worse.
What to specify: Socket depth (state minimum or “deep”), socket diameter (state to match handle), and fit tolerance (tight, no wobble).
What to verify on a sample: Twist the handle in the socket. Measure socket depth with a ruler or caliper. Look for filler material (epoxy, wedge) — if present, the fit was loose at the factory.
Need Better Connection Details Before Ordering?
Compare socket fit, fasteners and reinforcement on the actual shovel model before sample approval. Review the complete connection structure to reduce unexpected issues after production.
Welded, Riveted and Fastened Connections: What to Verify
Rivet or Pin Connection
A rivet or pin passes through the socket, the handle, and sometimes a strengthening strip. This is the most common connection method for wood and fiberglass handles.
What to verify:
- Rivet diameter and material. A thicker rivet resists shearing better. Ask the supplier what rivet size and material they use.
- Number of rivets. Confirm the number and position of fasteners. Different connection designs use different fastener configurations — evaluate the specific design on your sample rather than assuming a universal standard.
- Rivet tightness. The rivet should be flush with the socket surface, not protruding or recessed. A loose rivet will work its way out under repeated stress.
- Handle condition at rivet hole. On wood handles, check for splitting at the rivet hole — the hole weakens the wood, and splitting can start there. On fiberglass, check for delamination around the hole.
Welded Connection
The handle is welded directly to the blade or socket. This is most common on steel-handled tools.
What to verify:
- Weld quality. The weld should be continuous, not interrupted or porous. Look for cracks, gaps, or slag inclusions.
- Weld area corrosion protection. The weld area may have thinner coating than the rest of the tool. Check for bare metal at the weld.
- Weld position. The weld should be at the socket-to-handle junction, not on the blade itself. A weld on the blade creates a heat-affected zone that can weaken the steel.
Failure mode: Welded connections are very strong initially but are not repairable. If the weld cracks, the tool is scrap. Welded connections are best for tools where strength is the priority and repairability is not a concern.
Adhesive Connection
The handle is glued into the socket with epoxy or a similar adhesive. This is sometimes used as the primary connection (especially on fiberglass handles) and sometimes as a secondary measure alongside a rivet.
What to verify:
- Adhesive type. Ask the supplier what adhesive they use and what temperature range it is rated for. Adhesives can degrade under heat (e.g., a tool left in a hot truck or a container in summer).
- Adhesive coverage. The adhesive should fill the gap between handle and socket evenly. Squeeze-out around the socket opening indicates that adhesive was applied — but uneven squeeze-out may indicate inconsistent application.
- Adhesive as primary vs. secondary. Confirm whether adhesive is the primary connection or used alongside a mechanical fastener. Structural adhesive may be part of the joint design — the correct approach is to confirm the complete joint design and verify it on sample through strength testing appropriate to the use case.
Reinforced Connections
Several patent designs document reinforcement concepts that go beyond the basic socket-and-rivet approach — including reinforced necks with multi-directional rivet holes, combination pipes that surround the connection point, strengthening strips that distribute stress across the handle, and ferrules that add rigidity to the junction. These are examples of reinforcement concepts; their presence in patent literature shows that the designs have been proposed, not that they are universally adopted or guarantee superior performance.
For B2B buyers, the question is: does the supplier use any reinforcement at all, or is it a basic socket-and-rivet connection? If the supplier cannot describe the reinforcement, there may be none. Confirm on sample.
What to specify: Connection method (rivet/weld/adhesive/combination), reinforcement type (if any — ferrule, combination pipe, strengthening strip, reinforced neck), number of fasteners, and fastener material.
What to verify on a sample: Look for a collar, pipe, or additional metal at the socket-to-handle junction. If you see none, the connection is likely basic socket-and-rivet. Photograph the junction from multiple angles. If possible, request a cutaway sample showing the internal structure.
Common Looseness, Cracking and Misalignment Problems
Looseness
The most common connection complaint. The handle wobbles in the socket. Causes:
- Undersized handle. The handle diameter is smaller than the socket diameter. The fastener takes all the stress and eventually elongates the rivet hole.
- Moisture cycling (wood handles). The handle swells in humid conditions and shrinks in dry conditions. Over time, the fit loosens permanently.
- Adhesive degradation. The adhesive bond breaks down under heat or moisture, leaving the handle loose in the socket.
- Rivet wear. The rivet itself wears or elongates under repeated stress, creating play between the handle and socket.
Cracking
- Socket cracking. The socket wall cracks under lateral stress — typically at the rivet hole or at the socket-to-blade transition (the “neck”). This is a structural failure; the tool cannot be repaired.
- Handle cracking (wood). The handle splits along the grain — often starting at the rivet hole, where the drilled hole weakens the wood fiber.
- Weld cracking. The weld between handle and socket develops cracks under repeated stress. Once a crack starts, it propagates quickly.
Misalignment
- Tread-to-shaft misalignment. The tread is not perpendicular to the shaft. The blade twists under foot pressure, which the user feels as instability.
- Handle-to-blade misalignment. The handle is not centered in the socket. The tool pulls to one side during use.
- Misalignment from manufacturing, not use. If a sample shows misalignment, the production run will too. This is a tooling or assembly problem, not a wear issue.
What to verify on a sample: Twist the handle. Check for wobble. Sight down the shaft to the blade — check alignment. Look for cracks at the socket neck, rivet holes, and weld areas. Photograph any issues.
How Handle Material Changes Connection Design
The handle material determines which connection methods are available:
| Handle Material | Available Connection Methods | Best Reinforcement Options |
| Wood | Rivet, pin, wedge, adhesive | Strengthening strip, ferrule |
| Fiberglass | Rivet, adhesive (combination recommended) | Combination pipe, reinforced neck |
| Steel | Weld (permanent), rivet (replaceable) | Welded reinforcement collar |
Wood tolerates rivets well because it compresses around the rivet, creating a natural locking fit. But wood is also vulnerable to splitting at the rivet hole — so a strengthening strip that distributes stress across a wider area is valuable.
Fiberglass does not compress like wood. The rivet hole in fiberglass can delaminate under stress, so a combination pipe that surrounds the connection point and distributes stress is the most effective reinforcement.
Steel can be welded — the strongest connection — but welding is permanent. If repairability is a priority, a socket-and-rivet connection with a reinforcement collar is the alternative.
Simple Sample Checks Buyers Can Request
You do not need a laboratory to evaluate connection quality. These checks can be done on a sample in a few minutes:
| Check | How to Do It | What to Look For |
| Twist test | Hold blade, twist handle | No rotation or wobble |
| Pull test | Hold blade, pull handle straight out | No movement; handle is seated |
| Socket depth measurement | Insert ruler into socket alongside handle | Depth meets specification (deeper is better) |
| Rivet inspection | Visual + tactile | Flush, tight, no protrusion; no handle splitting at hole |
| Weld inspection (if applicable) | Visual | Continuous, no cracks, no bare metal |
| Reinforcement check | Visual at socket-to-handle junction | Look for collar, pipe, or strip — if none, connection is basic |
| Alignment check | Sight down shaft to blade | Tread perpendicular to shaft; handle centered in socket |
| Adhesive check (if applicable) | Visual at socket opening | Even squeeze-out; no gaps or missing adhesive |
Photograph the connection from these angles:
Socket-to-handle junction, side view
Rivet or weld close-up
Socket interior (if visible)
Reinforcement collar or pipe (if present)
Want Connection Detail Photos or Sample Checks?
Send your reference model and target use so the connection points to verify can be organized. Review the actual structure, attachment method and key details before approving samples or moving forward with production.
What to Freeze in the Production Specification
Once you have approved a sample, freeze the connection specification. This means documenting every detail so that the production run — and future repeat orders — match the approved sample.
| Specification Item | What to Record |
| Socket depth | Measurement in mm |
| Socket diameter | Measurement in mm |
| Handle diameter at socket end | Measurement in mm |
| Fit type | Tight, press, or loose (should be tight) |
| Connection method | Rivet, weld, adhesive, or combination |
| Fastener details | Rivet diameter, material, number |
| Reinforcement | Type (ferrule, combination pipe, strengthening strip, reinforced neck) — or “none” |
| Adhesive type | If used — brand/type and temperature rating |
| Alignment tolerance | Tread perpendicular to shaft; handle centered |
This specification becomes part of your golden sample record. When a repeat order arrives, compare the connection against this record. If the socket depth has changed, the rivet is smaller, or the reinforcement is missing, you have a documented basis for rejecting the shipment.
Next Step: Lock Down the Connection Before You Order
The connection between blade and handle is where shovels fail. Unapproved changes to the connection — a shallower socket, a smaller rivet, or a missing reinforcement — can alter joint performance and should be controlled through specification and sample verification.
Do not leave the connection to the supplier’s default. Specify the socket depth, the connection method, the reinforcement, and the fit. Verify on a sample. Freeze in the production specification. And on repeat orders, check that the connection has not quietly changed.
Send us your shovel specification — or a reference sample to match — and we can help verify the connection design, coordinate a sample review, and support a specification that holds up across orders, subject to model and factory feasibility.
Ready to Lock the Connection Specification?
Freeze the approved joint structure and measurements before the repeat order stage. Keep the confirmed connection details consistent so future production follows the same approved standard.
Related Articles
Wood vs Fiberglass vs Steel Shovel Handles: Procurement Trade-Offs for Wholesale Buyers
Garden Shovel Sample Test Plan Before Bulk Ordering: What to Measure, Load, Use and Photograph
Common Garden Shovel Complaints in Retail — and How Buyers Can Trace the Root Cause