









Updated 2 months ago
How to Inspect Square Point Shovels: Blade Flatness, Steps, Sockets, Rivets, Coating, and Load Tests
SCARECROW GARDEN SUPPLIER

Square Point Shovel QC Checklist: How to Inspect | Scarecrow Garden Supplier
Key Takeaways
- A structured inspection process for square point shovels covers five areas: specification confirmation, blade geometry, socket and connection, coating, and functional/load testing.
- The most common shovel defects — blade warping, socket cracking, rivet loosening, coating failure, and foot step deformation — are detectable through physical inspection without laboratory equipment.
- Acceptance criteria (pass/fail thresholds, load values) should be agreed between buyer and supplier before production — this guide does not prescribe universal standards because they vary by product and relationship.
- BS 3388 provides a standardized framework for forks, shovels, and spades testing — but the standard text must be purchased or confirmed through a laboratory; do not claim compliance without verification.
- Coating inspection should focus on edge coverage and adhesion (ASTM D3359 tape test), not just surface appearance.
You have shortlisted a square point shovel model. The price is right. The photo looks good. But photos do not show socket depth, rivet diameter, blade flatness, or whether the coating covers cut edges. Before you approve a bulk order, a structured inspection process can catch problems that would otherwise surface as customer returns, warranty claims, or a container of tools that do not meet your market’s expectations.
This guide provides a practical QC framework specifically for square point shovels. It covers what to check, why it matters, and what evidence to record — without requiring a testing laboratory for every order.
Who this guide is for: Importers, distributors, private-label buyers, and QC personnel who need to verify shovel quality before approving production.
Inspection Framework: Five Key Areas
| Area | What to Check | Purpose |
| 1. Specification confirmation | Model, dimensions, material, gauge/mm, handle, coating, packaging | Prevents “I thought you meant…” disputes |
| 2. Blade geometry | Flatness, edge straightness, concavity, foot step, shoulder | Catches forming defects and asymmetry |
| 3. Socket and connection | Socket depth, neck integrity, rivet/bolt fit, handle-to-head security | Catches the most common structural failure points |
| 4. Coating | Surface coverage, edge coverage, adhesion, color consistency | Catches corrosion risks before they reach the customer |
| 5. Functional and load testing | Twist, pull, scoop, and controlled load tests | Verifies the tool performs under realistic use |
Turn Your Shovel Specification Into A Practical QC Sheet
Send your drawing, buyer specification table, or product requirements. We can convert them into a clearer QC sheet by marking measurable items, visual inspection criteria, and tests that require agreement before production.
Step 1: Specification Confirmation
Before any physical inspection, confirm that what you are inspecting matches what you ordered.
| Field | Why It Matters | Common Issue |
| Model number | Links the sample to the production order | Wrong model sent as “equivalent” |
| Blade dimensions (L×W×D) | Determines capacity and fit | Sample wider or deeper than production |
| Steel thickness (mm) | Determines strength and weight | Thinner steel in production than sample |
| Steel grade/category | Baseline for performance expectations | “Steel” without specifying category |
| Forming method | Determines failure mode at stress points | Stamped sample, different process in production |
| Foot step type | Affects functionality | Sample has tread, production does not |
| Socket depth | Determines head-to-handle stability | Shorter socket in production |
| Handle material and length | Affects weight, ergonomics | Different wood or shorter handle in production |
| Coating type and color | Affects appearance and corrosion | Different coating or color in production |
| Packaging method | Affects transit safety | Sample individually wrapped, production bulk-packed |
Rule: If the specification sheet reads “steel blade, wooden handle,” it is not a specification — it is a label. Refer to the spec sheet template in Square Point Shovels Explained for the full field list.
Once the key specifications are clearly defined, buyers can review actual shovel models with verified product details. Explore our stainless steel garden shovel range to compare blade design, handle options, and available configurations for wholesale sourcing.
Step 2: Blade Geometry Inspection
Blade Flatness
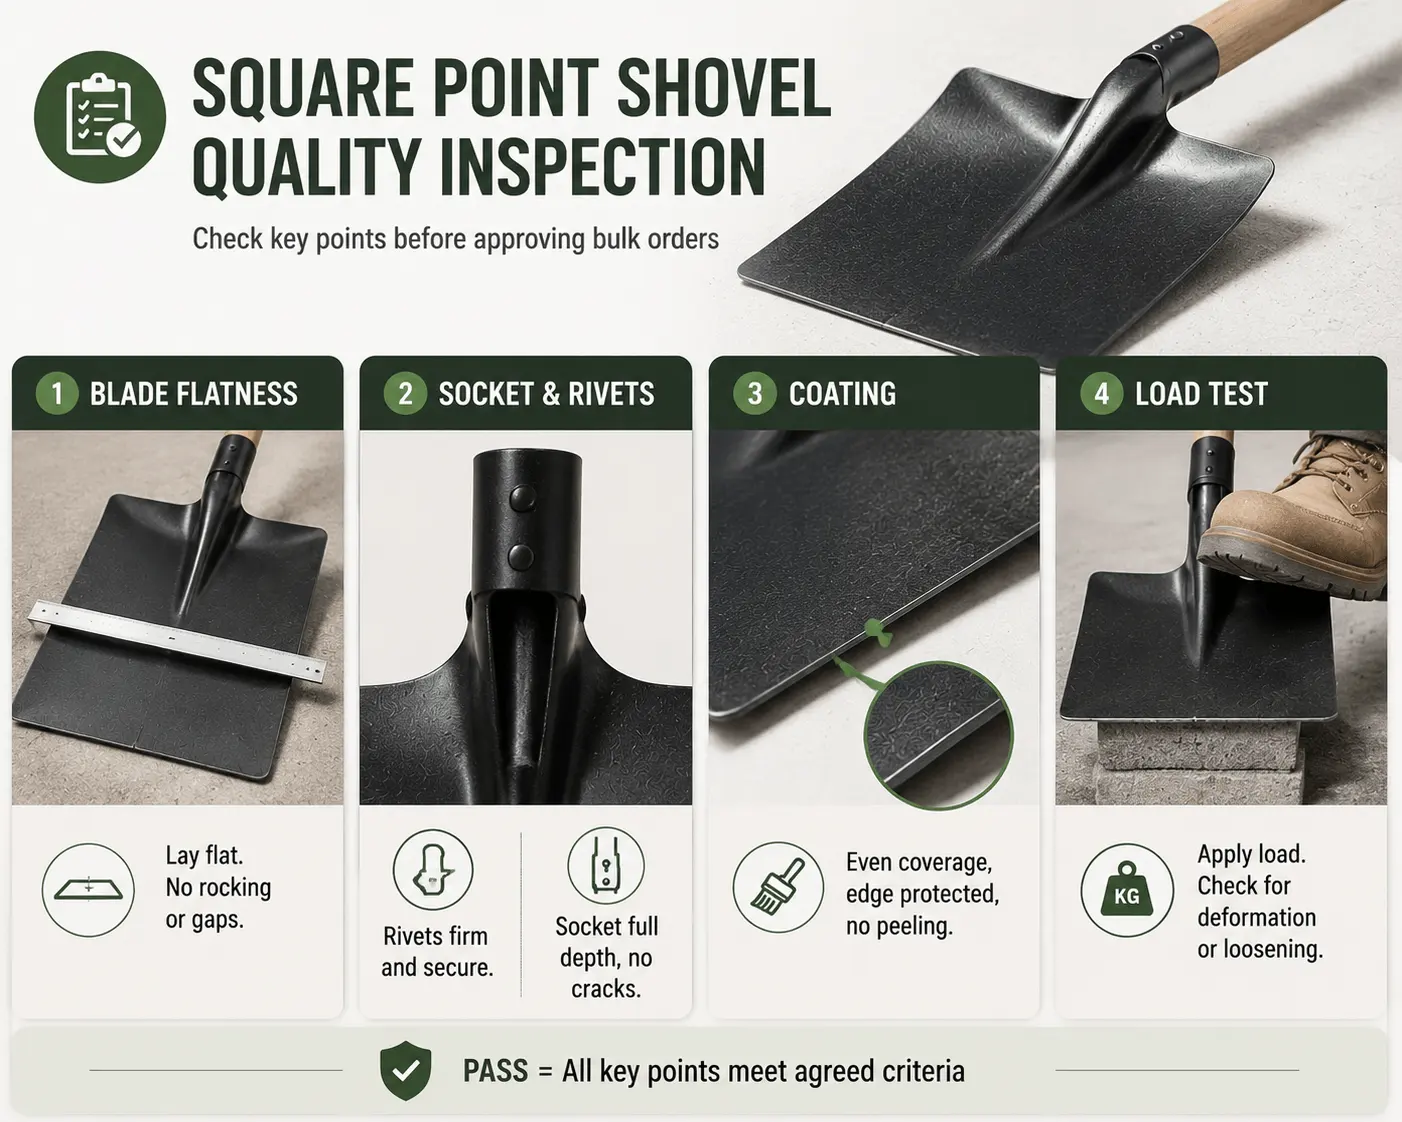
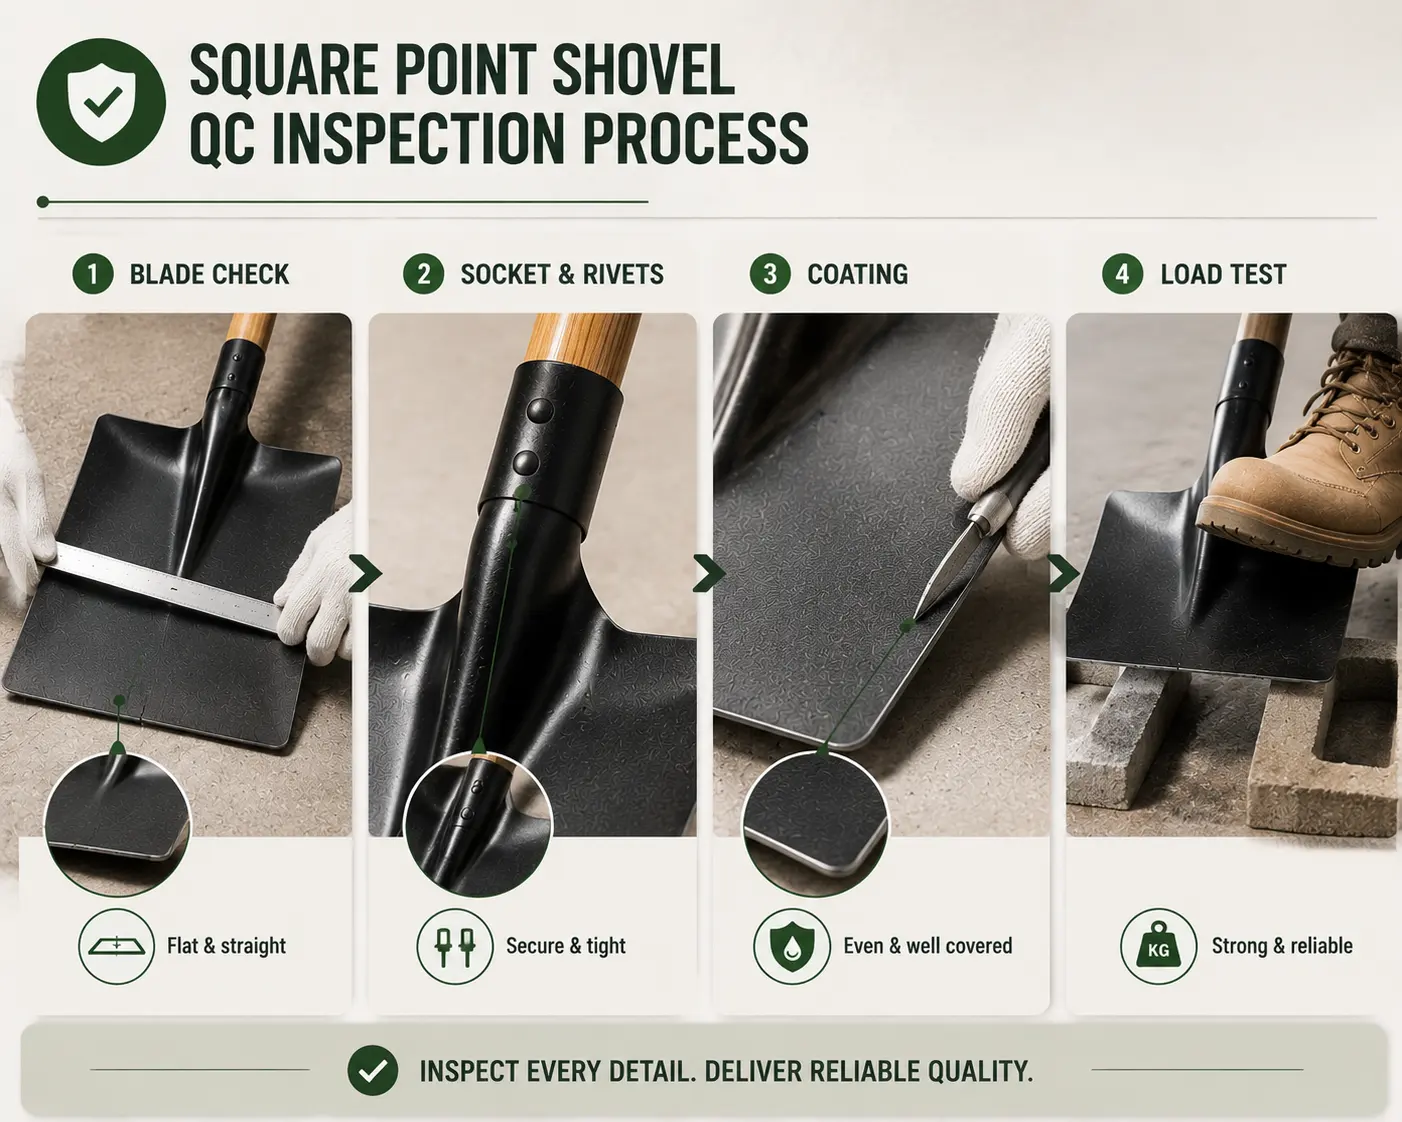
Lay the blade face-down on a flat surface. The blade should sit flat — no rocking, no visible gaps at the corners. Warping (twisting or bowing of the blade) is a forming defect that indicates poor stamping, roll-forging, or inadequate quality control after forming.
How to check: Place the blade on a known flat surface (a granite plate or straight-edge). Look for light gaps between the blade and the surface. Any gap greater than what is visually negligible indicates a warp that needs evaluation.
Edge Straightness
The cutting edge of a square point shovel must be straight — this is the defining feature of the tool. A wavy, curved, or bent edge means the forming die is worn or the blade was deformed after forming.
How to check: Lay a straight-edge along the cutting edge. Any gap between the straight-edge and the blade edge indicates deviation. For a square point shovel, this is a critical defect — the straight edge is the tool’s defining feature.
Concavity (Blade Dish)
The blade’s concavity (how deeply it is “dished”) determines how much material it holds. Measure the depth at the center of the blade. Compare against the specification. Variable concavity across a batch indicates inconsistent forming.
Foot Step (Tread)
If the model includes a foot step:
- Symmetry: The tread should be symmetrical — both sides (if side-tread) or the full width (if forward-turned) should be even
- Reinforcement: Check whether the tread area is reinforced (double-folded or thicker) — a single-thickness tread may deform under foot pressure
- Width: The tread should be wide enough to accommodate a work boot (typically 40+ mm)
Shoulder and Neck
The shoulder — where the blade meets the neck/socket — is a high-stress zone. Look for:
- Cracks or hairline fractures at the transition
- Wall thickness consistency at the shoulder — thinning here indicates poor forming
- Smooth transition — a sharp angle at the shoulder creates a stress concentration point
Step 3: Socket and Connection Inspection
Socket Depth
The socket is where the handle inserts into the blade head. Deeper sockets provide more contact area and better force transfer.
How to check: If possible, measure the socket depth with a depth gauge. If not, insert the handle and check how far it goes in — then check for any play or movement. A shallow socket concentrates stress at the rim, leading to cracking and head loosening.
Socket Interior
The socket interior should be clean and free of debris, weld spatter, or excess material. Any obstruction prevents the handle from seating fully, creating a loose fit.
Rivet or Bolt Inspection
| Check | What to Look For |
| Rivet diameter | Measure with calipers; compare against specification. Undersized rivets are the most common cause of head loosening. |
| Rivet count | Count rivets; confirm it matches the specification. |
| Rivet setting | Rivet heads should be properly formed — not flattened, not proud (sticking up), and centered on the hole. |
| Rivet material | Confirm rivet material is compatible with the blade and handle materials to prevent galvanic corrosion. |
| Bolt tightness (if bolted) | Check that bolts are tight and that the connection allows no movement. |
Handle-to-Head Security
- Twist test: Hold the handle firmly and attempt to rotate the head. Any rotational movement indicates a loose connection.
- Pull test: Grip the head and pull along the handle axis. The head should not separate from the handle under hand pressure.
- Flex test: Apply moderate bending pressure to the handle. Any creaking, cracking sounds, or visible deformation at the connection point is a failure indicator.
Create A Repeatable Sample Load Test Before Production
Need a repeatable sample load test? We can define the fixture, load point, force direction, duration, and evidence format before testing, so your team can evaluate samples with a clearer standard.
Step 4: Coating Inspection
Surface Coverage
- Check for even coating color and thickness across the blade surface
- Look for runs, thin spots, or bare patches — these indicate application problems
- Check for scratches that occurred during handling or packaging
Edge Coverage (Critical)
This is where most coating failures start. Stamped and cut steel parts have cut edges that may not receive adequate coating coverage. Check all edges — particularly the cutting edge, shoulder edges, and socket rim. If bare steel is visible, rust will begin there.
Adhesion Check (Simplified ASTM D3359)
For a practical (non-laboratory) adhesion check:
- Press a piece of adhesive tape firmly onto the coated surface, then pull it off
- If coating particles transfer to the tape, adhesion is poor
- This is a simplified version of ASTM D3359 (the standard tape test method) — it does not replace formal testing but provides a quick field check
Important: Do not describe this simplified test as “ASTM D3359 certified” or “BS 3388 compliant.” It is a practical field check, not a laboratory certification. For formal compliance, the test must be conducted by a qualified laboratory using the full standard procedure.
Color Consistency
If color matching matters for your brand or retail presentation, compare the sample against a color reference. Variable color across a batch indicates inconsistent coating application.
Step 5: Functional and Load Testing
Functional testing means using the shovel the way your customer will use it.
Scoop Test
Push the blade into loose material (soil, sand, or gravel) and scoop a full load. Check:
- Does the blade penetrate the material consistently?
- Does the blade flex or deform under load?
- Does the head remain secure on the handle during use?
- Does the material release cleanly from the blade (soil adhesion test)?
Load Test (Controlled)
Apply a controlled load to the blade at a specified point and direction. This tests the combined effect of steel thickness, grade, heat treatment, and geometry.
What to define before testing:
- Load point (where on the blade the force is applied)
- Direction (downward, lateral, or twisting)
- Magnitude (how much force)
- Duration (how long the force is held)
- Acceptance criteria (what constitutes pass vs. fail)
Important: Acceptance criteria must be agreed between buyer and supplier before testing. This guide does not prescribe universal load values because they vary by product type, size, and intended use. BS 3388 provides a standardized framework for shovel and spade testing — but the standard text must be purchased or confirmed through a laboratory. Do not claim BS 3388 compliance without verified testing.
Protect Blade And Coating Quality During Shipping
Prevent blade and coating damage in transit. Ask us to review blade-edge protection, head separation, handle movement, and carton strength to help reduce damage risks before shipment.
Packaging Inspection
Packaging problems cause damage that is often blamed on the product rather than the packing.
Blade Protection
- Inter-contact check: When shovel heads touch in packaging, blade edges scratch each other. Check whether heads are separated by interleaving material, individual wrapping (such as hessian cloth), or spacing in the carton.
- Edge protection: The cutting edge should be protected from impact. Exposed edges can pierce carton walls and damage adjacent products.
Handle Protection
- Bending risk: Long handles (1,200–1,500 mm) can bend if cartons are stacked heavily. Check that carton length accommodates the handle without forcing it into a bent position.
- Junction protection: The head-to-handle junction should be protected from impact. A blow to the junction during transit can crack the socket or loosen the fastener.
Carton and Labeling
- Carton rigidity: Cartons should be rigid enough to protect contents under normal stacking. Soft or under-filled cartons collapse.
- Labeling: Confirm model numbers, quantities, and any private-label markings match the order.
- ISTA transit testing: The International Safe Transit Association provides standardized packaging test procedures for drop, vibration, and compression. These tests can be arranged if packaging performance is a concern.
Defect Classification
| Defect Class | Examples | Action |
| Critical | Blade cracked through; socket cracked; head separates from handle under hand pressure; handle cracked through | Reject — do not accept |
| Major | Blade warped (visible deformation); edge not straight (critical for square point); loose rivet; coating missing on cut edges; socket significantly shorter than spec | Rework or reject — depends on frequency |
| Minor | Light surface scratch on coating; minor color variation; small rough spot on handle | Acceptable — note for monitoring |
AQL and Sampling Rates
Acceptance Quality Limit (AQL) levels and sampling rates should be agreed between buyer and supplier before production. This guide does not prescribe universal AQL standards because they vary by product type, price point, and buyer-supplier relationship. What matters is that standards are defined, documented, and agreed before production starts — not negotiated after defects are found.
Inspection Report: What to Record
Every inspection should produce a documented record:
Photo evidence: Blade front and side, edge straightness, socket close-up, rivet close-up, handle connection, coating edges, foot step, packaging
Measurements: Blade dimensions (L×W×D), steel thickness (at specified points), socket depth, handle length, rivet diameter (if measurable)
Test results: Twist test (pass/fail), pull test (pass/fail), scoop test (observations), load test (if conducted)
Defect log: Any defects found, classified as critical/major/minor
Disposition: Approved / approved with conditions / rejected — with reasons
Receive A Complete Sample Approval Pack Before Production
Receive a documented sample approval pack with key information organized clearly. Measurements, close-up photos, test videos, product differences, and unresolved points can be reviewed before you approve production.
Handle configuration also affects how users apply force during real-world use. For buyers comparing working motion, leverage, and control differences, see Long Handle vs. D-Grip Shovel: Reach, Leverage, Control, and Retail Positioning.
FAQ
How many samples should I inspect? The sampling rate depends on the order quantity and the agreed AQL standard. For a first order, inspect the golden sample thoroughly, then sample randomly from production. Work with your supplier or a third-party QC service to define the sampling plan before production starts.
Can I inspect shovels without visiting the factory? Yes. You can inspect a shipped sample, request photos and videos from the supplier, or hire a third-party inspection service. The key is to have a documented inspection checklist and agreed acceptance criteria. A video recording of the agreed checks provides evidence without a factory visit.
What if the factory cannot provide BS 3388 test data? BS 3388 is a British Standard for forks, shovels, and spades that specifies requirements and test methods. The standard text must be purchased or confirmed through a laboratory. If the factory has not conducted BS 3388 testing, do not claim compliance. Instead, use the practical inspection methods described in this guide — caliper measurements, twist/pull tests, and controlled load tests — and note that formal standard testing can be arranged if required.
What is the most common defect in square point shovels? Blade warping and edge deviation are the most common defects specific to square point shovels — because the straight edge is the tool’s defining feature, any deviation is immediately visible. For all shovel types, socket loosening and rivet failure are the most common structural defects. Prioritize these areas in your inspection.
Should I use the same QC checklist for all shovel types? The framework is the same, but the specific checks vary. A round point shovel needs edge sharpness testing that a square point does not. A garden spade needs blade-to-handle angle verification. Use the five-area framework as a template and adjust the specific checks for each tool type.