










Updated 2 months ago
Pruning Shears Quality Inspection Checklist: Samples, Cutting Tests and Packaging
SCARECROW GARDEN SUPPLIER
Pruning Shears Quality Inspection Checklist: Samples & Testing Guide | Scarecrow Garden Supplier
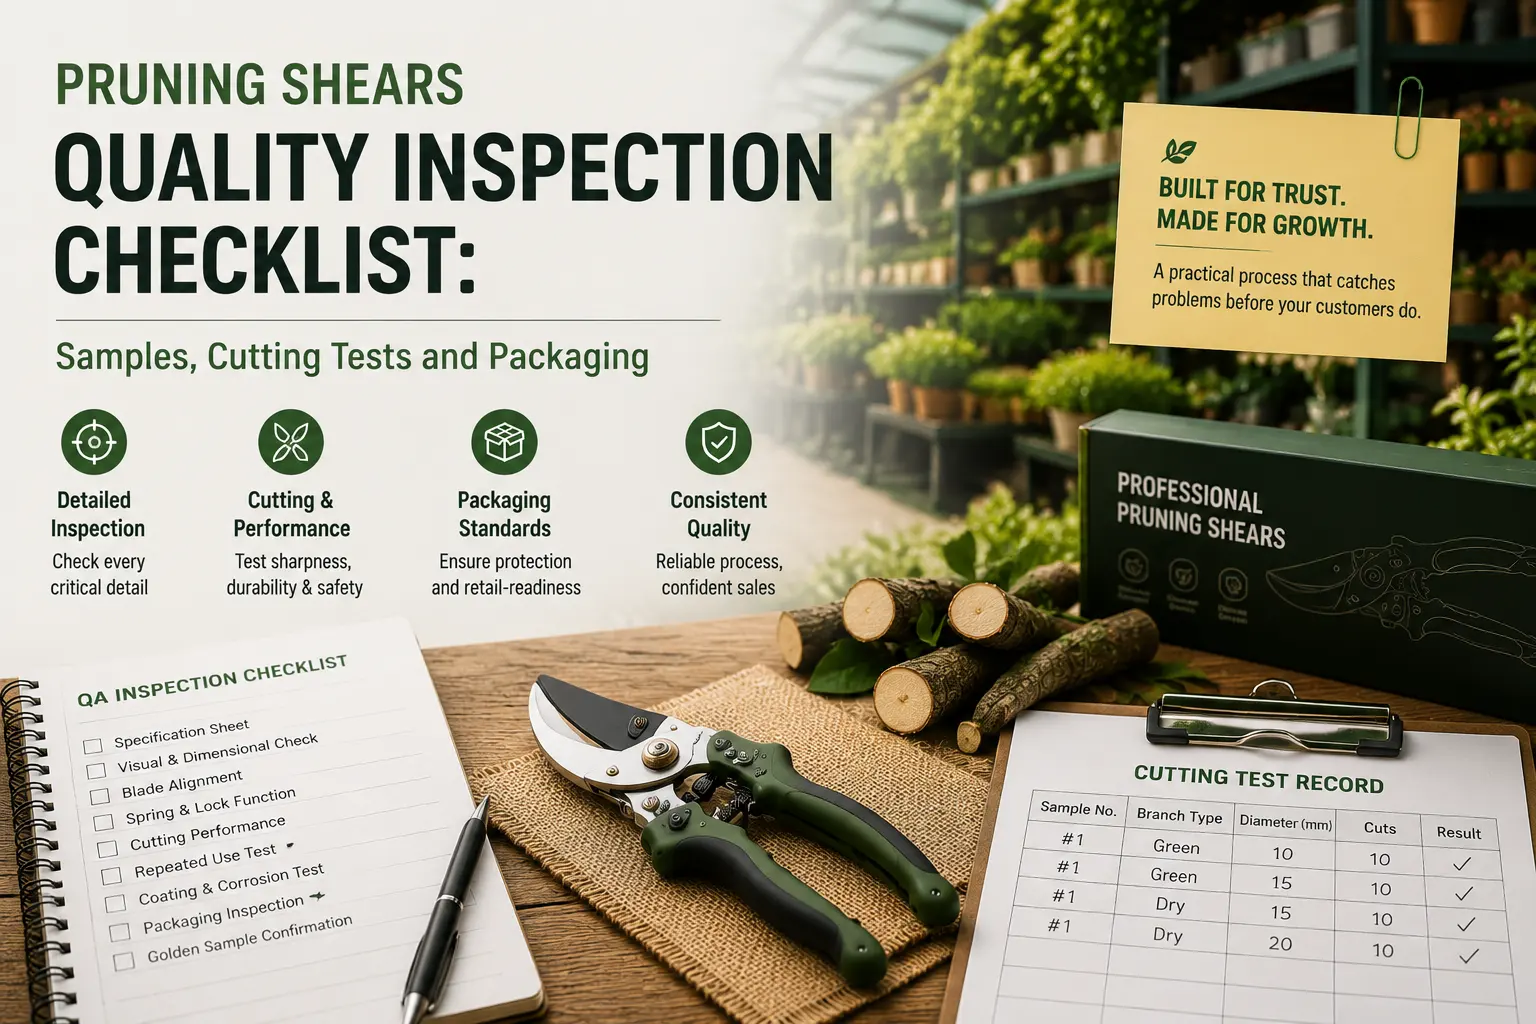
A pruning shear sample that looks good and makes one clean cut is not ready for approval. The blade might misalign after 50 cuts. The spring might pop out during normal use. The lock might stick when your customer tries to open it with one hand. The coating might flake after the first week in a humid shed. The packaging might let the blade tip poke through the blister card before it reaches the retail shelf.
This checklist is for buyers who need to turn “it looks fine” into “we checked it properly, and we have the records to prove it.” Each section covers a specific inspection area — from the specification sheet you should build before testing, through visual and dimensional checks, blade alignment, spring and lock function, grip and balance, cutting performance, repeated use, coating and corrosion, packaging, and the golden sample that anchors your bulk production standard. The goal is not to run a laboratory certification. The goal is to give you a practical, repeatable process that catches the problems that matter before they reach your customers.
If you source pruning shears from multiple factories and need someone on the ground to compare samples, photograph details and verify packaging before shipment, send your product list and inspection requirements to Scarecrow Garden. We organize sample comparison at our warehouse in Nanjing and send you structured reports with photos and measurements.
Before evaluating quality, buyers should first understand the different Types of Pruning Shears: Wholesale Guide to Uses, Price & Quality.
1. Before Testing: Create a Complete Specification Sheet
Do not test a sample without a reference. A specification sheet is the document that defines what you are checking against. Without it, you are comparing the sample to your memory of a photo on a product listing — and that is not a reliable standard.
The specification sheet should include every parameter that matters for the product you are buying, not just the parameters the factory chooses to highlight. A catalog description that says “SK5 blade, forged aluminum handle” is a marketing summary. A specification sheet that says “SK5 high carbon steel blade, HRC 55–62 (supplier claim, not independently verified), 2.5 mm blade thickness at pivot, forged aluminum handle with TPR overmold, volute spring, thumb catch lock, 210 mm total length, 240 g net weight, 20 mm maximum cutting diameter” is a working document that you can measure against.
Fields to include in a pruning shear specification sheet:
| Field Group | Required Fields |
| Identity | Internal SKU / supplier model number; product category (bypass, anvil, snip, ratchet, lopper, electric) |
| Dimensions and capacity | Total length; blade length; net weight; maximum blade opening; supplier’s stated cutting diameter and the conditions under which it was measured |
| Materials and construction | Blade material and hardness (if reported); blade thickness at pivot; surface treatment / coating; body / handle material; grip overmold material; spring type (volute, wire, buffer); lock type (latch, thumb catch, side catch) |
| Structure and ergonomics | Pivot structure (rivet, bolt, adjustable); hand orientation (left, right, universal); replaceable parts list |
| Brand and packaging | Unit packaging format; packaged dimensions and weight; units per master carton; carton dimensions and gross weight; MOQ |
| Purchase and evaluation | Quote date and quantity; confirmed strengths; risks and items marked “Not Confirmed” |
Any field you cannot confirm should be marked “Not Confirmed” — not left blank, not filled with a guess, and definitely not replaced by the factory’s catalog copy. A specification sheet with gaps is still useful; a specification sheet with unverified claims written as confirmed facts is worse than no sheet at all, because it creates false confidence.
When you receive a sample, the first step is to measure it against this sheet. If the sample does not match a confirmed field, that is a deviation to record. If a field was “Not Confirmed” and the sample reveals the actual value, update the sheet. The specification sheet evolves with each sample — it is a living document, not a one-time form.
2. Visual and Dimensional Inspection
Before you test how the tool performs, check whether it was built correctly. Visual and dimensional inspection catches the problems that cutting tests cannot — because a pruner that cuts cleanly on the first try might still have structural flaws that show up later.
Visual checklist — look for these on every sample:
- Blade surfaces: scratches, nicks, discoloration, uneven coating, rust spots on areas that should be clean
- Blade edges: chips, rolled edges, uneven grinding marks, burrs at the tip
- Handle and grip: misaligned overmold, gaps between grip and handle body, visible glue lines, rough edges that could catch skin
- Pivot area: visible misalignment between blades, loose rivet or bolt, gap between blade and counterblade at the pivot point
- Spring: correct position, no deformation, no rust
- Lock: sits properly when engaged, no visible damage to the catch mechanism
- Logo and markings: correct placement, no smearing or misalignment (especially important for OEM/private label orders)
- Overall symmetry: left and right sides should match; a bypass pruner with visibly asymmetric blade positioning is already flagged
Dimensional checklist — measure these and compare to the specification sheet:
- Total length (mm)
- Blade length (mm)
- Net weight (g)
- Maximum blade opening (mm) — measure from blade tip to counterblade tip when fully open
- Handle span at widest grip point (mm) — this affects hand fit
- Packaged dimensions and weight — compare to what was quoted
Record every measurement. A sample that is 5 mm shorter than the specification or 15 g lighter than the stated weight is not necessarily defective — but it is a deviation, and deviations need to be noted and discussed with the factory before you approve anything.
Many ISO 9001-certified factories state “100% visual inspection for finished products” in their quality documentation, though the actual inspection coverage may vary by factory and by product. This is a factory-side process, not your process. Your job is to verify that the sample you received actually passed that inspection — and the way to verify is to look at it yourself, not to trust the certificate on the wall.
3. Blade Alignment, Gap and Pivot Check
The blade alignment is where the cutting happens. If the blades do not meet correctly, the tool will crush instead of cut, leave ragged edges on live branches, or require excessive force to close — and none of these problems are obvious from a single visual glance.
Bypass pruner alignment check:
- Close the blades slowly and watch where the cutting blade meets the hook (counterblade). On a well-aligned bypass pruner, the cutting blade slides past the hook with light contact along the full length of the cutting edge — not just at the tip, not just at the pivot, but along the entire working surface.
- Look for a visible gap between the blades when partially closed. A gap wider than approximately 0.5 mm at any point along the cutting edge means the tool will tear rather than cut live branches. This is not a precision measurement — it is a visual check that catches obvious misalignment before you waste time on a cutting test.
- Check lateral play (side-to-side movement at the blade tip when the tool is closed). Excessive lateral play means the pivot is too loose, and the blades will shift during cutting. Minimal play is normal on a well-built pruner; noticeable wobble is a problem.
- Open and close the blades 10 times slowly. Listen for scraping, grinding, or uneven resistance. A pruner that scrapes on one side of the closing stroke has a blade that is riding against the counterblade instead of sliding past it — this will dull the blade quickly and make cutting feel inconsistent.
Anvil pruner alignment check:
- Close the blade onto the anvil surface and check whether the blade edge lands on the center of the anvil pad, not offset to one side. An off-center blade will create uneven pressure and may fail to cut harder material cleanly.
- Check that the blade makes full contact with the anvil surface along its length, not just at one point. Point contact means the blade is either warped or the anvil surface is uneven.
Pivot tightness:
- The pivot should hold the blades firmly enough that they do not shift sideways during normal cutting, but not so tight that the tool is difficult to open. A pivot that can be wiggled with finger pressure is too loose. A pivot that requires effort to open after each cut is too tight. The right setting is somewhere between — and it is specific to each tool, because different blade geometries and different spring tensions require different pivot settings.
Professional-grade pruners often feature adjustable pivot systems. FELCO’s precision adjustment system allows the user to fine-tune the blade and counterblade alignment, which means the pivot can be set to the correct tension for that specific tool rather than relying on a one-size rivet. Corona’s BP-3180D uses an adjustable pivot bolt with a locking nut, which serves the same purpose — adjustable tension that can be maintained over time. These design choices matter because they make the tool serviceable: when the pivot loosens after months of use, it can be re-tightened instead of discarded. On entry-tier pruners with fixed rivets, the pivot tension is set once at the factory and cannot be adjusted — if it is too loose or too tight, that is what you get for the life of the tool.
When you check alignment on a sample, you are not just checking whether this specific tool cuts well today. You are checking whether the pivot design allows the tool to maintain correct alignment over the service life your customers expect. A fixed rivet that is perfectly tight on day one but cannot be adjusted when it loosens after three months is a design limitation worth recording — not a defect to reject, but a fact to know before you commit to a bulk order.
4. Spring Return and Safety Lock
The spring and the lock are the two components that most directly affect how the tool feels in the hand and how safely it can be carried. A spring that does not open the blades fully after each cut slows the user down. A lock that does not hold the blades closed when the tool is in a pocket or holster creates a safety risk. Both are easy to overlook during a quick sample check — because a new spring usually works, and a new lock usually engages. The question is whether they keep working.
Spring return check:
- Open and close the pruner 20 times at a normal working speed. After each cut, the blades should spring back to the fully open position smoothly and consistently — not partially, not with a delay, not with a jerky motion that varies from one cycle to the next.
- Watch the spring position during these cycles. A volute spring should stay seated in its channel. A wire spring should stay hooked on its anchor points. If the spring shifts, pops out of position, or shows visible deformation after 20 cycles, it will not survive hundreds of cycles in actual use.
- Check that the opening speed feels natural — not so fast that the tool snaps open aggressively (which can surprise the user and cause hand strain), and not so slow that the user has to manually pull the blades apart (which defeats the purpose of having a spring at all).
Lock check:
- Engage and disengage the lock 10 times with one hand, using the grip style that your target customer would use. Some locks are designed for thumb operation (thumb catch), others for a sliding motion (side catch), and others for a simple latch flip. The lock type is not the issue — the issue is whether the specific lock on this specific sample works reliably with one hand, without requiring two hands or excessive force.
- Check that the lock holds the blades fully closed. When locked, the blade tip should not be accessible — a lock that allows the blade to protrude even slightly when “closed” is a safety gap, not a convenience feature.
- Check for pinch points. When the lock engages or disengages, there should be no mechanism edge that catches the user’s skin. This is especially important for ratchet pruners, where the lock mechanism is often larger and more exposed.
- After the 20-cycle spring test above, re-check the lock. A lock that worked perfectly on cycle 1 but sticks or loosens by cycle 20 is a durability problem, not a one-time glitch.
Lock types vary across brands and models — a latch (as on Okatsune) or a thumb catch (as on Corona, depending on model) are both legitimate designs, and neither is inherently better. What matters for your sample check is whether the specific lock on the specific sample works as intended, every time, with one hand, for the user group that will actually use this tool.
5. Grip, Hand Fit, Weight and Balance
Weight on a specification sheet is a number. Weight in the hand is an experience — and the two do not always match. A 240 g pruner that carries its weight near the pivot feels different from a 240 g pruner that carries its weight near the blade tips. A handle span of 80 mm that fits a medium hand feels different from an 80 mm span on a handle with thick overmold that effectively narrows the grip. The specification sheet gives you the data; the hand-fit test gives you the reality.
Hand-fit check:
- Have at least two people with different hand sizes test the grip — one with smaller hands (typically women’s glove size S–M) and one with larger hands (men’s glove size L–XL). Record each person’s feedback: does the handle span feel right, too wide, or too narrow? Does the grip surface provide secure hold without pinching? Are there edges that press into the palm or fingers during a simulated cutting motion?
- Measure the handle span at the widest point where the fingers wrap around the grip. Compare this to the specification sheet. A handle that is 5 mm wider or narrower than stated is not necessarily wrong — but it is a deviation that affects hand fit, and it should be recorded.
- Check the overmold: is it evenly applied, or does it bulge on one side and thin on the other? Uneven overmold creates uneven grip pressure, which becomes uncomfortable during extended use.
Weight and balance check:
- Hold the pruner in the cutting position (blades partially open, ready to close on a branch). Where does the weight sit? If the tool feels heavy at the blade end, the user has to work against that weight during each cut. If the weight sits near the handle, the tool feels lighter in the cutting position even if the total weight is the same. Balance is not about total weight — it is about where the weight is distributed.
- Do not judge weight as a standalone quality indicator. A heavier professional pruner with forged aluminum handles and adjustable pivot may feel more balanced and more comfortable during extended use than a lighter entry-tier pruner with stamped steel handles and a fixed rivet. The weight matters in context: what materials, what structure, what balance, what use duration.
Extended-use consideration:
For professional-grade samples that will be used for hours of continuous cutting, a 10-second grip test is not enough. Parish (1998) tested the operating force requirements of nine manual pruning shears and found that four models required significantly lower operating force — two anvil types and two bypass types — with neither type consistently requiring less force. This suggests that the mechanical design (pivot position, blade geometry, spring tension, handle angle) matters more for long-term comfort than the tool type alone. For samples targeting professional users, consider an extended trial: 50–100 cuts on real branch material, followed by the same hand-fit questions asked after fatigue, not just after the first impression.
A pruning shear that feels fine for 10 seconds but causes discomfort after 200 cuts is not a quality tool for professional use — it is a tool that was approved based on an incomplete test. If you sell to professional users, your sample check should reflect their actual work intensity, not just a quick squeeze in a meeting room.
So far we have checked how the tool is built and how it feels in the hand. Now we check what it actually does — because a pruner that fits your hand perfectly but cannot cut a 15 mm branch cleanly is still a problem.
6. Cutting Performance Test
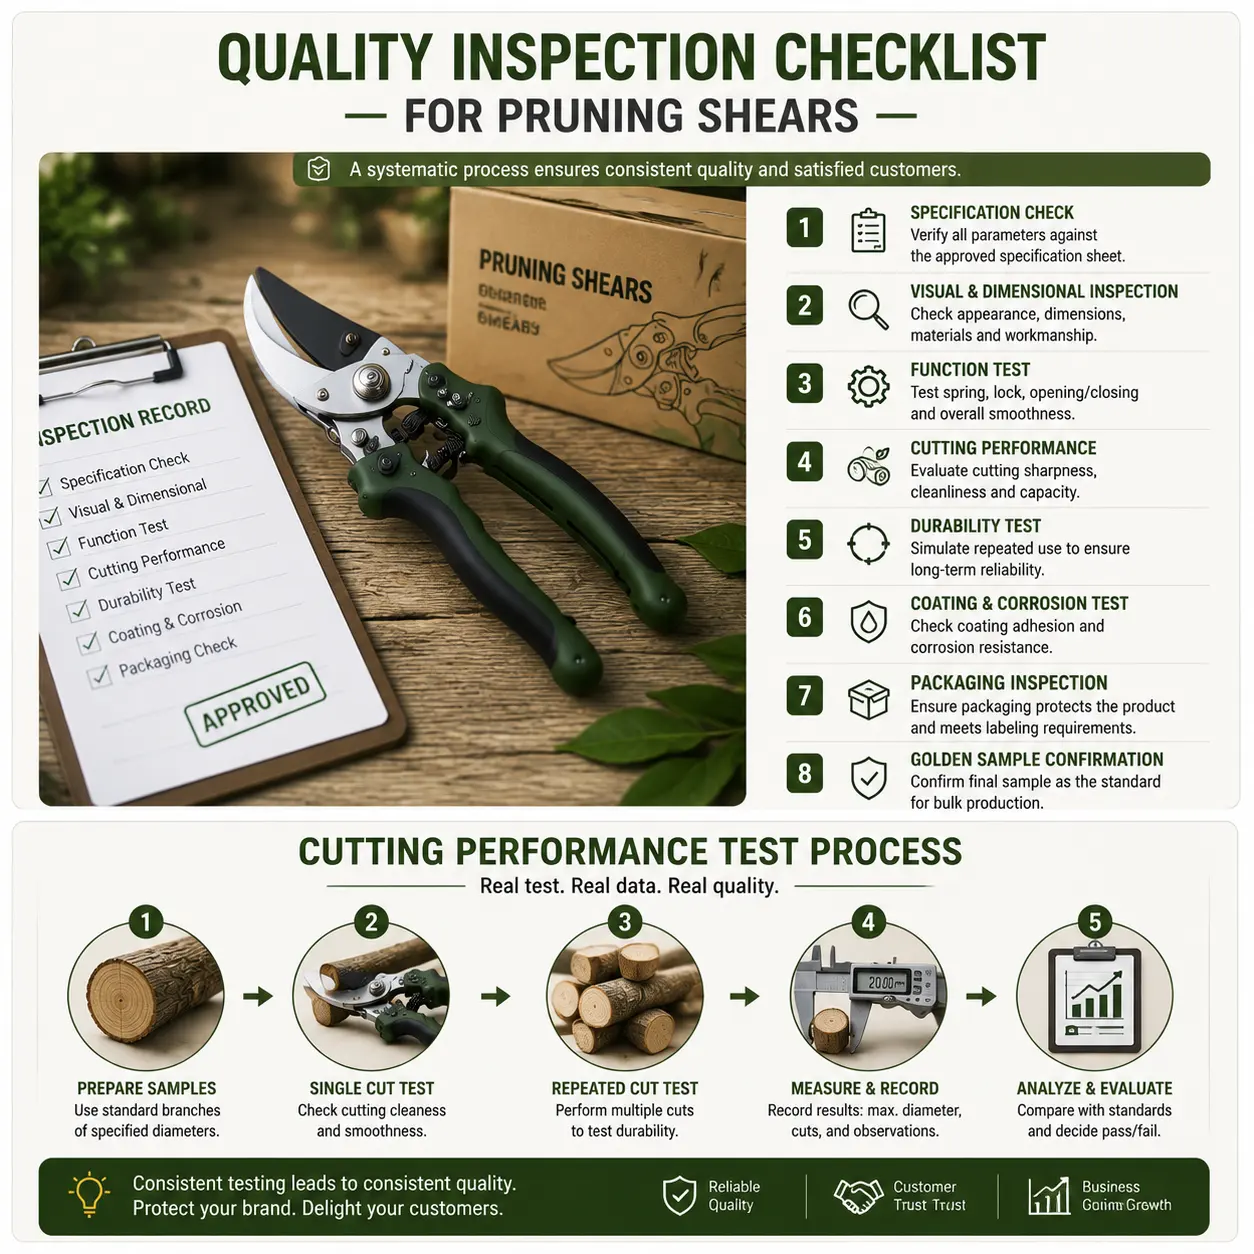
This is the test that most buyers care about most — and the one most commonly done wrong. A cutting test that uses random branches from the office garden, without controlling diameter, species, or moisture content, produces results that cannot be compared across samples or repeated for verification. The test is still useful as a general impression, but it is not a basis for approving or rejecting a sample.
Principles for a fair cutting test:
- Use the same type of material for all samples in a comparison round. If you are testing three bypass pruners, cut the same branches with all three — not rose stems with one, apple branches with another, and privet with the third. Different materials require different forces, and mixing materials makes the comparison meaningless.
- Use branches of similar diameter within each test round. Research on apple tree branches has shown that cutting force correlates strongly with branch diameter (R² = 0.93 in controlled experiments) and that cutting torque requirements differ significantly across cultivars (Fuji, Gala, Honeycrisp, Golden Delicious). This means that a 15 mm Fuji branch and a 15 mm Golden Delicious branch may require different cutting forces even at the same diameter. For a practical sample test, you do not need laboratory precision — but you do need consistency. Use branches from the same plant, or at least the same species, and group them by diameter range (e.g., 8–10 mm, 12–15 mm, 18–20 mm).
- Test both live (green, moist) and dry (dead, hardened) branches separately — because bypass and anvil pruners are designed for different materials, and a bypass pruner that struggles on dead wood is not defective; it is being used on the wrong material.
- Do not substitute paper, cardboard, or rope for real branch material. These materials test sharpness, not cutting performance. A pruner that slices paper cleanly may still crush a live branch if the blade alignment is off.
What to record during each cut:
| Observation | What to Look For |
| Cut quality | Does the blade sever the branch cleanly in one motion, or does it require multiple squeezes? Is the cut surface smooth, or does it show crushing, tearing, or fiber pull-out? |
| Cutting effort | How much hand force does each cut require? This is subjective, but consistent across a comparison — if sample A cuts the same branch with noticeably less effort than sample B, that is a real difference worth recording. |
| Branch jamming | Does the branch get stuck between the blades after cutting? Jamming indicates either insufficient blade overlap or a blade geometry that traps material. |
| Blade damage | After cutting 5–10 branches, inspect the blade edge for nicks, rolls, or visible wear. A blade that shows damage after 10 cuts on normal-diameter branches will not survive a season of regular use. |
| Sap and residue | Does sap stick to the blade excessively? Does the coating help reduce sap adhesion, or does the blade need wiping after every few cuts? This affects user experience and cleaning frequency. |
Cut quality matters beyond sharpness. Marchi et al. (2013) found that double-blade pruning tools (bypass-type) produced cleaner cuts with faster wound closure compared to single-blade (anvil-type) tools in high-quality wood plantations. This is relevant for your sample test because it confirms that the cutting mechanism — not just the blade sharpness — affects the quality of the cut your customer’s plants receive. A bypass pruner with well-aligned blades should produce a clean, flat cut on live wood. If it does not, the alignment is off, the blade geometry is wrong, or the tool is being tested on material it was not designed for.
Cutting capacity vs. stated capacity:
The supplier’s stated cutting diameter (e.g., “20 mm” or “25 mm”) is a reference point, not a guarantee. Test the sample at the stated diameter and at one diameter below it. A pruner that cuts 20 mm branches cleanly but struggles at 25 mm may still be acceptable if your customers typically cut branches under 20 mm. A pruner that struggles at its own stated capacity is either overrated or underbuilt — and either way, it is a finding that should go into your report before you approve a bulk order.
If you need someone to organize a structured cutting test with consistent branch material, photograph the cut surfaces and record the results, contact Scarecrow Garden with your sample list and target branch diameters. We can run comparison tests at our warehouse and send you documented results.
7. Repeated Opening and Cutting Checks
A single clean cut proves sharpness. Repeated cuts prove durability. The difference between a sample that passes a one-time cutting test and a sample that survives real use is the difference between a product your customer returns and a product your customer recommends.
What to test over repeated cycles:
- Open and close the pruner 50–100 times without cutting (just the opening/closing cycle). This tests the spring, the pivot, and the lock under repetitive mechanical stress. After the cycle count, re-check: does the spring still return fully? Does the pivot still hold alignment? Does the lock still engage and disengage cleanly? Any component that degrades noticeably over 50–100 cycles will degrade faster under actual working conditions.
- Cut 20–50 branches of consistent diameter and material. This tests the blade edge retention, the pivot under cutting load, and the handle comfort over sustained use. After the cutting cycles, inspect: does the blade edge still look clean, or does it show visible wear, nicks, or rolls? Does the pivot still hold the blades in correct alignment, or has it loosened? Does the handle still feel comfortable, or has the overmold started to shift or the grip started to feel fatiguing?
Why cycle counts are guidelines, not standards:
There is no industry-wide standard for how many cycles a pruning shear sample must survive before approval. The appropriate number depends on the tier you are buying. An entry-tier pruner designed for occasional home use does not need to survive 500 cutting cycles — but it should survive 50 without obvious degradation. A professional-tier pruner designed for daily orchard work should survive 200+ cycles without significant blade wear or pivot loosening.
The cycle count for your sample test should be agreed between you and the factory before the test begins, and it should reflect the use frequency your target customer expects. Write the agreed count into the specification sheet or the purchase order — not as a guarantee, but as a shared understanding of what “acceptable performance” means for this specific product at this specific tier.
Blade edge retention across materials:
Based on industry experience, SK5 high carbon steel blades typically retain usable sharpness for approximately 200 cuts before showing noticeable edge wear, while stainless steel blades typically retain sharpness for approximately 50 cuts — but actual numbers vary with blade geometry, cutting material, and maintenance. These figures are not test results from a specific sample; they are general material behavior patterns that help you set expectations. Your actual sample test will tell you what this specific blade does under your specific test conditions.
What to record after repeated cycles:
| Component | Check After Cycles |
| Blade edge | Visible wear, nicks, rolls, or edge deformation compared to the pre-test condition |
| Pivot alignment | Same alignment check as Section 3 — do the blades still meet correctly? |
| Spring return | Same spring check as Section 4 — does it still open fully and consistently? |
| Lock function | Same lock check as Section 4 — does it still engage and disengage cleanly? |
| Handle/grip | Overmold shifting, grip surface wear, comfort change compared to first impression |
| Overall feel | Does the tool feel the same as it did on cut #1, or has something changed? |
If any component shows noticeable degradation after the agreed cycle count, record it and discuss it with the factory before approval. The degradation may be acceptable for the tier (an entry-tier blade showing slight wear after 50 cuts is normal), or it may be a warning sign (a professional-tier blade showing visible edge damage after 50 cuts is not normal). Context determines whether a finding is acceptable or problematic — and the specification sheet with its tier definition is the context.
Repeated cuts test whether the tool survives work. The coating and corrosion check tests whether it survives storage — because a blade that stays sharp through 200 cuts but rusts after two weeks in a garden shed has failed a different kind of durability test.
8. Coating, Cleaning and Basic Corrosion Screening
The coating on a pruning shear blade serves two practical purposes: it reduces sap adhesion (which makes the tool easier to clean between cuts), and it provides a first layer of corrosion resistance (which affects how the tool survives storage in humid conditions). Neither purpose is tested by looking at the coating on a new sample — because a new coating always looks good.
Sap and residue cleaning check:
- After the cutting test in Section 6, wipe the blade with a clean cloth. Does the sap come off easily, or does it require scrubbing? Does the coating help — does a coated blade release sap more easily than an uncoated blade on the same type of branch?
- For professional-grade samples where frequent cleaning is expected (orchard workers who disinfect blades between trees), the cleaning ease matters as much as the cutting performance. A blade that cuts well but requires vigorous scrubbing after every 10 cuts is a tool that slows the user down in practice.
Coating durability check:
- After the repeated cutting test in Section 7, inspect the blade surface under good light. Look for coating flaking, scratching, or wear at the cutting edge and at the pivot area. A coating that shows visible damage after 50 cutting cycles on normal branch material will degrade faster in actual use — where the tool encounters harder materials, rougher handling, and longer exposure to moisture.
- Compare the blade surface to a reference photo taken before testing. Coating damage that is visible in a side-by-side comparison but not obvious on a quick glance is still damage — and it will accumulate over the tool’s service life.
Basic corrosion screening — what this is and what it is not:
- Wipe a test blade with a damp cloth and leave it in a humid environment (a closed plastic bag with a few drops of water) for 24–48 hours. Then inspect for rust spots, discoloration, or coating reaction. This is a rough screening test that can help identify blades with poor corrosion resistance — it is not a salt spray test, it is not a laboratory certification, and it does not replace formal corrosion testing if your market requires compliance documentation.
- If you need verified corrosion data for regulatory compliance or product claims, arrange a separate laboratory test (salt spray per ASTM B117 or equivalent). Scarecrow’s internal screening catches obvious problems; it does not produce certifiable data, and we do not represent it as such.
Blade hardness context:
Supplier-reported hardness values for pruning shear blades typically fall in these ranges: SK5 high carbon steel after proper heat treatment, HRC 55–62 (supplier claim, not independently verified); 65Mn medium carbon steel, approximately HRC 53 (supplier claim). These numbers come from factory documentation and product listings — they are reference points for understanding material tier differences, not test results from the specific sample you are holding. If blade hardness is a critical specification for your order, confirm the value with the factory and, if necessary, arrange independent hardness testing on the actual production batch.
Disinfection compatibility:
For samples that will be used in disease-sensitive environments (orchards, vineyards, nurseries where cross-contamination between plants is a concern), check whether the blade and coating survive common disinfection practices. Beer and Rundle (1987) found that soaking pruning shear blades in 70% ethanol for 2 seconds reduced recoverable pathogen counts by approximately 10,000-fold — but this finding was specific to fire blight bacteria under controlled experimental conditions, and it does not guarantee the same reduction for all plant pathogens in all field situations. What it does confirm is that ethanol disinfection is a standard practice in professional pruning, and your sample should survive it: after wiping the blade with 70% ethanol and letting it dry, inspect for coating reaction, discoloration, or surface changes. A blade coating that degrades after ethanol exposure will not survive the disinfection routine that professional users depend on.
9. Packaging and Transport Readiness
Packaging is the last thing most buyers check and the first thing their customers see. A pruning shear that arrives at the retail shelf with a scratched blade, a broken blister card, or a missing instruction sheet has already failed — regardless of how well the tool itself performed in your sample tests.
Blade safety in packaging:
- Is the blade secured inside the packaging so it cannot shift during transport? The blade should be held in place — by a blade guard, by the lock mechanism engaged, by the packaging structure itself, or by a combination. A blade that can move inside its package will eventually find something to cut — and that something might be the packaging itself, or a customer’s finger when they open it.
- Is the lock engaged in the packaged position? If the lock is not engaged, the blade is free to open during handling. This is both a safety risk and a presentation problem — the customer who opens the package and finds the blades already open may assume the tool was used or damaged.
- Does the product shift inside the package when you shake it? A tool that rattles in its box or blister card will experience repeated micro-impact during shipping. Over thousands of units in a container, that micro-impact adds up to blade edge contact, coating abrasion, and spring displacement.
Packaging elements to verify:
| Element | What to Check |
| Blister card / clamshell | Seal integrity, blade tip containment, peg hole position and size, card stock thickness |
| Color box | Inner tray or insert that holds the tool in place, box construction that survives stacking, printing quality and color consistency |
| Oxford pouch / holster | Stitching integrity, blade tip containment, belt loop or clip attachment, material durability |
| Barcode and labeling | Correct SKU barcode, correct product name, correct country of origin, any regulatory markings required for your market |
| Instructions and warnings | Presence of usage guidance, safety warnings (especially for markets with labeling regulations), language correctness |
| Master carton | Carton markings match order (product name, model, barcode, gross/net weight); inner packing count matches specification; carton strength sufficient for stacking and container shipping |
E-commerce channel additional checks:
For products sold through online channels (Amazon, Shopify, marketplace platforms), the packaging faces additional stress that retail shelf packaging does not:
- Drop test simulation: drop a packaged unit from approximately 1 meter onto a hard surface. Does the packaging protect the tool? Does the blade tip penetrate the packaging? Does the blister card crack? Does the color box collapse? A packaging that fails a single drop from 1 meter will fail more often in the actual shipping environment — where packages are tossed, stacked, compressed, and sometimes dropped from higher than 1 meter.
- Compression test: stack three master cartons and check whether the bottom carton’s structure holds. Container shipping stacks cartons higher than three — but three is enough to catch cartons that are too thin or too weak for their contents.
- Blade tip penetration risk: after the drop test, check whether the blade tip has created any opening in the packaging. A blade tip that pokes through a blister card or a color box creates both a safety hazard and a product damage risk — and it is one of the most common packaging failures in mail-order pruning shear shipments.
Third-party pre-shipment inspection standards (ANSI/ASQ Z1.4-2003 (R2018) / ISO 2859-1) require that at least 80% of the order quantity is packed and ready for inspection before a PSI can proceed. This is a procedural requirement, not a quality standard — but it means that your packaging check should happen when the packaging is actually representative of what will be shipped, not when a few units have been hand-packed for the sample review.
Packaging is only one factor influencing cost. Buyers can also read Why Pruning Shears Prices Differ: Materials, Weight, QC & Packaging for a complete pricing breakdown.
10. Golden Sample and Bulk Inspection
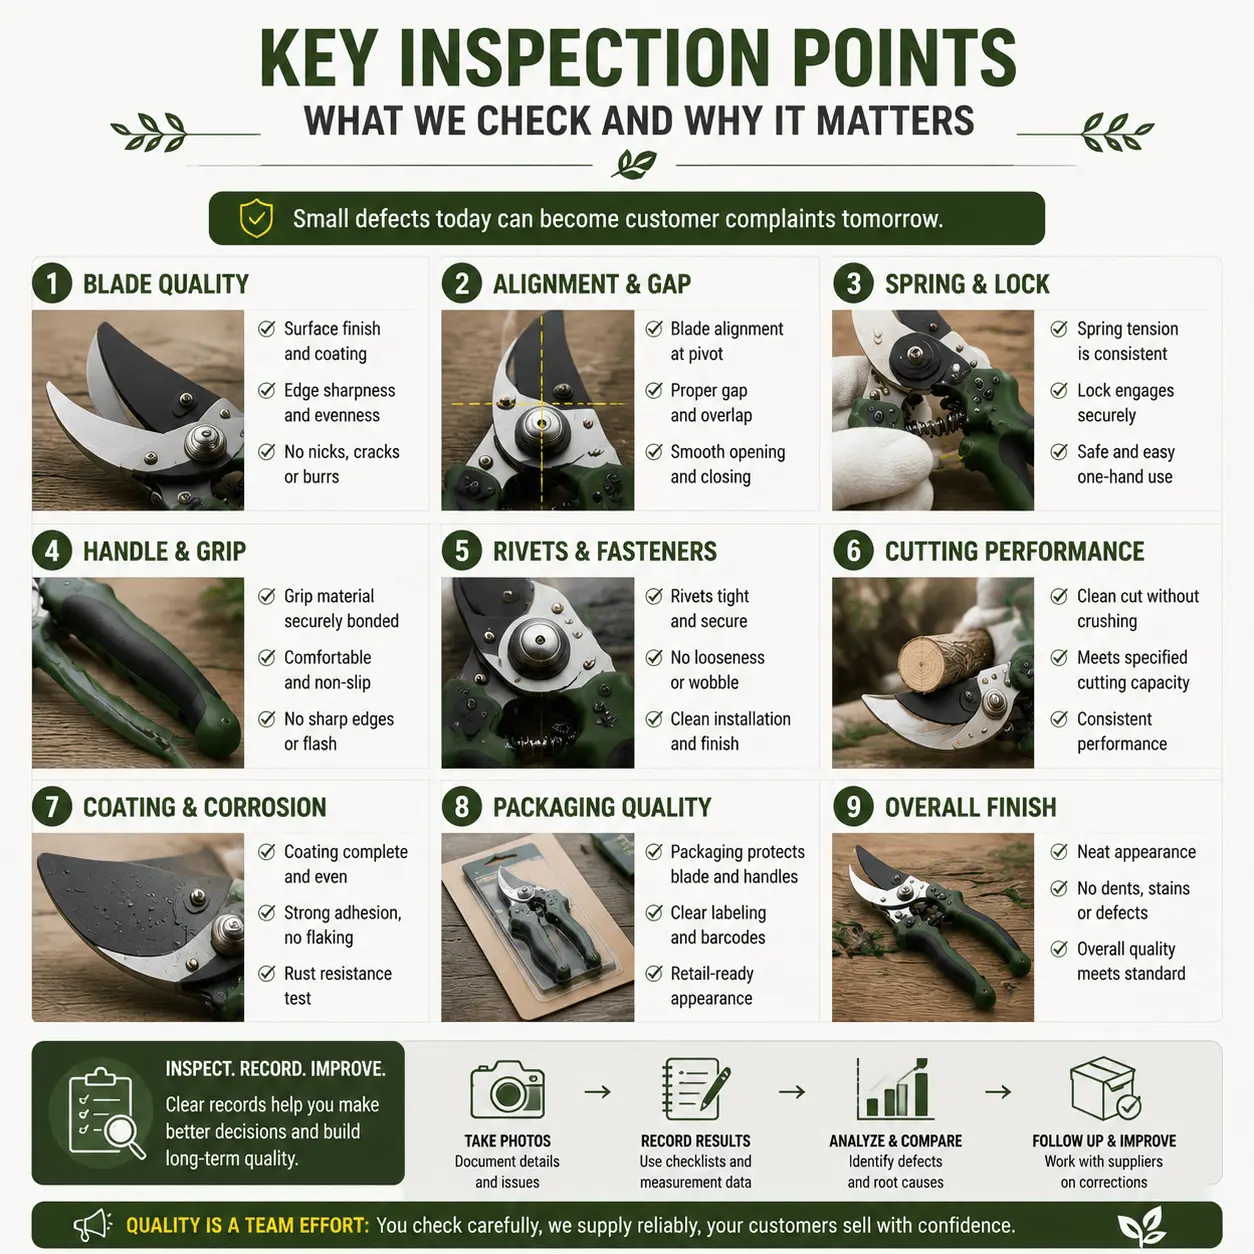
When you approve a sample, you are creating the standard that bulk production will be measured against. That standard needs to be tangible, documented, and accessible — not just a memory of a tool that seemed fine during a meeting.
What to do when you approve a sample:
- Sign and date the approved sample. Write your name, the date, and the approval reference (order number or internal SKU) directly on the sample or on an attached tag. This makes the approved sample traceable — when a dispute arises about whether bulk production matches the approved standard, a signed and dated physical reference resolves the question faster than an email thread.
- Photograph the approved sample from multiple angles: both blade surfaces, the pivot area, the handle grip, the lock mechanism, the spring position, the overall tool, and the packaging. These photos become part of the specification sheet — they show what “approved” looked like, not just what the specification sheet described.
- Seal the approved sample in a bag or container with the approval documentation. This is your golden sample — the physical reference that stays on file for the duration of the production relationship. When bulk production arrives, you (or your inspection partner) compare it to this physical reference, not to your recollection.
- Keep at least one duplicate golden sample at the inspection location. If Scarecrow is handling pre-shipment checks for you, we keep a reference sample at our warehouse so that the inspector has a physical comparison point — not just a PDF specification sheet.
Bulk inspection: how it works and what it checks:
Pre-shipment inspection for pruning shears follows the AQL (Acceptable Quality Limit) sampling method defined in ANSI/ASQ Z1.4-2003 (R2018) (ISO 2859-1). This is the international standard for statistical sampling in export inspection. It does not check every unit — it checks a statistically determined sample size from the production batch, and it accepts or rejects the batch based on the number of defects found in that sample.
Inspection timing options:
| Inspection Type | When It Happens | What It Checks |
| Initial Production Check (IPC) | When 5–10% of production is complete | Early detection of systematic problems before the full batch is built |
| During Production Inspection (DPI) | When 30–50% of production is complete | Mid-production verification that corrections from IPC were applied |
| Pre-Shipment Inspection (PSI) | When 100% is manufactured and at least 80% is packed | Final check before shipment — the most common inspection point for export orders |
Defect classification:
| Category | Definition | AQL Typical Range | Examples for Pruning Shears |
| Critical | Zero tolerance — safety or regulatory failure | Effectively AQL 0.25 or tighter (no defects allowed) | Blade cannot be locked closed; structural crack or fracture risk; sharp edge exposed in packaging without protection |
| Major | Functional failure — the tool does not work as intended | AQL 0.65–1.0 | Blade misalignment that causes crushing instead of cutting; spring that does not return blades fully; lock that does not engage; blade edge with visible nick that affects cutting |
| Minor | Cosmetic or non-functional deviation | AQL 1.5–2.5 | Coating scratch that does not affect function; slight overmold unevenness; packaging label with minor printing error; weight deviation within tolerance |
These AQL ranges are reference values from general inspection practice, not fixed thresholds for pruning shears. The specific AQL levels for your order should be agreed with the factory in writing before production begins. Different buyers apply different standards — a professional-grade order may use tighter AQL levels than an entry-tier order, and a market with strict consumer safety regulations may require zero tolerance on more defect categories.
The golden sample is the comparison point, not the specification sheet alone.
A specification sheet says “SK5 blade, 210 mm total length, volute spring.” A golden sample shows what an SK5 blade at 210 mm with a volute spring actually looks like when it passes your approval. The bulk inspection compares the production units to the golden sample — checking whether the blade surface matches, whether the pivot feels the same, whether the spring position is consistent, whether the packaging looks identical. The specification sheet provides the data; the golden sample provides the visual and tactile reference. Both are needed.
11. What a Useful Inspection Report Should Include
An inspection report that says “sample approved” without evidence is an opinion. An inspection report that documents what was checked, what was found, and what needs discussion is a decision-making tool. The difference matters when a bulk production dispute arises — because the report is the record that determines whether the factory met the standard or did not. A report that documents decisions, not just opinions, looks like this:
Structure of a useful inspection report:
| Section | Content |
| Order and sample identification | Order number, SKU, supplier model, date of inspection, inspector name |
| Specification sheet reference | The confirmed specification sheet that the sample was measured against — attached or embedded |
| Measurement data | Actual measurements (total length, blade length, net weight, handle span, blade opening) compared to specification values, with deviations highlighted |
| Visual inspection findings | Checklist results with photos of any deviations — not just “passed visual check,” but specific observations with visual evidence |
| Functional test results | Spring return, lock engagement, blade alignment, cutting performance — described with enough detail that another person could reproduce the test and get comparable results |
| Cutting test details | Branch material, diameter range, number of cuts, cut quality observations, any blade damage noted |
| Repeated cycle results | Cycle count agreed and completed, component condition after cycles, any degradation noted |
| Packaging check | Packaging format, blade safety in package, drop test results (if applicable), labeling verification |
| Defect list | Any critical, major, or minor defects found — categorized and described with photos |
| Conclusion and items for buyer decision | Clear statement: approved, approved with conditions, or not approved — plus any items that need the buyer’s decision (e.g., “blade alignment is slightly off at the tip but cutting performance is acceptable — buyer to decide whether this deviation is within tolerance”) |
Photos and video:
Every deviation should be photographed. Every measurement should be recorded with the tool visible in the frame (so the photo shows which tool, which side, which feature). If a cutting test is performed, photograph the cut surfaces — a clean cut and a crushed cut look different in a photo, and the difference is evidence that supports your approval or rejection decision. Video is useful for functional checks: a 5-second clip of the spring return, the lock engagement, or a cutting cycle shows the tool’s behavior more clearly than a written description.
Third-party inspection companies (V-Trust, QARMA, UTS, and others) produce structured reports with AQL sampling data and photographic records. These reports follow a standard format that covers the inspection scope, the sampling method, the defect findings, and the pass/fail conclusion. If Scarecrow handles your sample comparison or pre-shipment check, we produce a similar structured report — with measurements, photos, functional test observations, and a clear conclusion that gives you the information you need to make a decision, not just a “looks fine” summary.
12. How Scarecrow Supports Sample and Pre-Shipment Checks
For buyers who cannot be on the ground in China, we handle sample comparison and pre-shipment verification at our warehouse in Nanjing — running the checks that matter most before you commit to bulk or before a container leaves.
What we do for sample checks:
- Receive samples from multiple suppliers at our warehouse in Nanjing. When you are comparing three bypass pruners from three different factories, we receive all three, organize them side by side, and run the comparison — so you are comparing the actual tools, not comparing product listings on a screen.
- Measure, photograph, and document each sample against your specification sheet. We produce a structured comparison report with measurements, photos, functional test observations, and a clear conclusion — not just “looks fine,” but “here is what we found, here is what deviates, and here is what needs your decision.”
- Run cutting tests with consistent branch material. If you specify the diameter range and the branch type, we can prepare test material and run the comparison under controlled conditions — same branches, same diameter range, same number of cuts for each sample. The results come back with cut surface photos and effort comparisons, so you can see which sample actually performs better rather than guessing from specifications.
- Verify packaging and labeling. We check whether the blade is secured in the package, whether the lock is engaged, whether the barcode and labeling match your requirements, and whether the packaging survives a drop test. This is the check that most buyers skip because they are focused on the tool — and it is the check that prevents the most common customer complaint (tool arrived damaged or unsafe in the package).
What we do for pre-shipment checks:
- Compare bulk production units to your golden sample. We keep a reference copy of your approved sample at our warehouse, and when production is ready for shipment, we pull a statistical sample per AQL standards and compare each unit to the golden sample — checking dimensions, visual quality, functional performance, and packaging consistency.
- Produce a structured inspection report with measurements, photos, and a pass/fail conclusion. The report documents what was checked, what was found, and whether the batch meets the agreed standard. If defects are found, they are categorized (critical, major, minor) and photographed — so you have the evidence to discuss corrections with the factory before the shipment leaves.
- Coordinate corrections with the factory when problems are found. If a DPI or PSI reveals a systematic issue (e.g., blade misalignment on 15% of units, or packaging that does not protect the blade tip), we communicate the finding to the factory, track the correction, and re-check the affected units — so the problem is resolved before shipment rather than discovered after delivery.
What our reports do not cover:
Laboratory certification, salt spray test reports, and independent hardness testing require specialized equipment and accredited laboratories. If your market requires certified corrosion or hardness data, we can help you identify a testing lab — but we do not produce the data ourselves, and our internal screening results should not be treated as equivalent to accredited test reports.
Our reports give you the information to decide. The approval or rejection of a sample or a production batch is always your decision — based on your tolerance for deviations, your market’s requirements, and your relationship with the factory.
Send us your product list, specification sheets, and inspection requirements. Scarecrow Garden can organize sample comparison, run structured cutting tests, verify packaging, and produce documented inspection reports — all at our warehouse in Nanjing, before your order ships.
FAQ
How do you test pruning shear samples before a bulk order?
Build a specification sheet first — define every parameter you care about (dimensions, materials, spring type, lock type, packaging). Then check the sample systematically: visual and dimensional inspection against the spec sheet, blade alignment and pivot check, spring return and lock function, hand fit and balance, cutting performance on consistent branch material, repeated cycle testing, coating durability and cleaning ease, packaging safety and transport readiness. Record every observation. If the sample passes, sign it, date it, photograph it, and seal it as your golden sample — the physical reference that bulk production will be measured against.
How should you document alignment deviations for factory discussion?
Record three things: where the deviation is (tip, pivot area, or full-length), how severe it is (estimated gap width in mm, or “visible gap but less than 0.5 mm”), and whether the pivot design allows correction (adjustable bolt or fixed rivet). Photograph the misalignment with the blades partially closed — a photo that shows the gap location is more useful than a written description. If the pivot is adjustable, note whether adjusting it resolved the issue or whether the misalignment persists after adjustment. Send this documentation to the factory with a specific request: “The cutting blade shows a visible gap at the tip area when partially closed. Adjusting the pivot reduced the gap but did not eliminate it. Can you adjust the blade geometry or pivot setting for the next sample, and confirm whether this deviation is within your production tolerance?” This turns a subjective observation into a structured discussion point with a clear action request.
How should buyers test cutting performance fairly?
Use the same branch material for all samples in a comparison — same species, same moisture condition, similar diameter range. Research on apple tree branches shows that cutting force correlates strongly with branch diameter (R² = 0.93 in controlled experiments) and that different cultivars require different cutting torque. This means mixing branch types across samples produces unreliable comparisons. Test live and dry branches separately (bypass and anvil pruners are designed for different materials). Record cut quality, effort, jamming, blade damage, and sap adhesion for each sample. Do not substitute paper or rope for real branches — these test sharpness, not cutting performance.
What packaging defects are common for pruning shears?
The most common: blade tip penetrating the blister card or color box (safety hazard and product damage), lock not engaged in the packaged position (blade free to open during shipping), product rattling inside the package (micro-impact damage over thousands of units in a container), barcode or labeling errors (wrong SKU, wrong origin country, missing regulatory markings), and master carton too weak for stacking (bottom carton collapses under container shipping conditions). For e-commerce channels, add drop test failures — packaging that cracks or allows blade exposure after a 1-meter drop will fail more often in actual shipping.
What is a golden sample for pruning shear orders?
A physical sample that you have inspected, approved, signed, dated, and sealed — with photographs documenting its condition at the time of approval. The golden sample stays on file as the reference standard for bulk production. When production units arrive for pre-shipment inspection, they are compared to this physical reference (not just to a specification sheet, and not to your memory of what the sample looked like). Keep at least one golden sample at your location and one at the inspection location — so the inspector has a tangible comparison point during PSI.
Can a basic internal test replace a laboratory corrosion test?
No. A 24–48 hour humidity screening test (damp cloth wipe, stored in a closed bag with moisture) can help identify blades with obviously poor corrosion resistance — but it does not produce certifiable data, it does not simulate salt spray conditions, and it does not meet the standards required for regulatory compliance or formal product claims. If your market requires verified corrosion performance (e.g., ASTM B117 salt spray test results), arrange a separate laboratory test. Scarecrow’s internal screening is a practical risk-reduction step; it is not a substitute for accredited testing when certification is required.
Let's Build Your Ideal Pruning Shear Portfolio
Great pruning shear collections are created through the right product selection, pricing strategy and supply planning. Share your market goals, order quantities, packaging requirements and reference photos with our team.
📩 Work With GardenToolsWholesale