











Updated 2 months ago
Garden Tool Testing for Buyers: Load, Bending, Impact, Coating, Corrosion, and Packaging Tests
SCARECROW GARDEN SUPPLIER

Garden Tool Testing for Buyers: Load, Bending, Coating, and Packaging | Scarecrow Garden Supplier
Key Takeaways
- Testing should start from the failure risk you need to prevent — not from a generic checklist. A tool that will be used for light leaf collection does not need the same tests as a shovel used for daily landscaping work.
- There are three testing levels: field comparison (quick, practical, not standardized), factory testing (repeatable, documented, agreed acceptance criteria), and third-party standardized testing (formal, traceable, for compliance or certification).
- ASTM D3359 (tape adhesion) and ASTM B117 (salt spray) are standard entry points — but they are test procedures, not pass/fail guarantees. Hours of salt spray do not predict years of outdoor service.
- Packaging testing is often overlooked. Long-handled tools are vulnerable to transit damage, and ISTA procedures provide a framework for evaluating packaging performance.
- Test results are only useful if they are documented, repeatable, and fed back into specifications. A test that cannot be reproduced cannot verify a specification.
You have a sample shovel in front of you. The factory says it passed their quality check. Your customer says it bent on the first day of use. What do you do now?
You test. But test what? And how? And what does “passing” actually mean?
This guide explains how to build a testing program for garden tools — rakes, shovels, and forks — that starts from the failure risks you need to prevent and produces repeatable, documented evidence. The goal is not to turn every buyer into a testing laboratory. It is to help you ask for the right tests, define them clearly, and interpret the results without overclaiming.
Who this guide is for: Importers, brand owners, and quality managers who need to specify, arrange, or interpret garden tool tests.
Three Testing Levels
Before choosing specific tests, understand the three levels of testing available:
| Level | What It Is | When to Use | Cost | Evidence Quality |
| Field comparison | Practical, hands-on comparison of two or more samples using real or simulated use conditions | Initial sample selection; comparing two models; quick go/no-go decision | Low | Qualitative — useful for decision-making, not for specification verification |
| Factory testing | Repeatable test with defined fixture, load point, direction, duration, and acceptance criteria — performed at the factory or arranged by the supply team | Pre-production approval; batch verification; corrective action verification | Medium | Quantitative — documented with photos, measurements, and video |
| Third-party standardized testing | Formal testing to a published standard (ASTM, BS, ISO) performed by an accredited laboratory | Compliance verification; customer requirement; dispute resolution | High | Formal — traceable test report with standard reference |
Most buyers need Level 1 and Level 2. Level 3 is for compliance or when a formal test report is required by a customer or market regulation.
The key principle: A test is only useful if you know what failure you are trying to prevent. Do not test everything. Test the risks that matter for your product and market.
Step 1: Define Risk and Acceptance Criteria Before Testing
Before arranging any test, answer these questions:
What failure mode are you testing for? Bent tine? Loose head? Coating failure? Handle split?
What load or condition will the tool experience in service? This determines the test parameters.
What is the acceptance criterion? What result constitutes “pass” and what constitutes “fail”? This must be agreed between buyer and supplier before testing — not after.
How many samples? One sample tells you about that sample. Multiple samples tell you about consistency. For batch verification, agree on a sample quantity.
What evidence do you need? Photos, measurements before and after, video of the test, and a written report.
Without these answers, a test produces a result but no decision. “The tine bent 15 degrees under 5 kg load” is a fact. Whether that is acceptable is a decision — and that decision must be defined before the test.
Understanding common failure points helps buyers select the right tests. See Garden Tool Failure Points: Why Heads Loosen, Handles Split, Tines Bend, and Coatings Peel.
Dimensional and Visual Baseline
Before any functional test, establish the baseline:
Dimensional Checks
| Check | Tool Type | What to Measure | Why It Matters |
| Head width | Rakes, forks | Overall width at widest point | Confirms model matches specification |
| Tine count and spacing | Rakes, forks | Number of tines; center-to-center spacing | Consistency affects performance and quality perception |
| Tine cross-section | Rakes, forks | Two perpendicular dimensions at mid-tine | Determines bending resistance |
| Blade dimensions | Shovels, spades | Length × width; depth of dish | Confirms model and use category |
| Steel thickness | Shovels | At center, shoulder, and edge (post-forming) | Verifies specification; checks for forming thinning |
| Socket depth | All | Internal depth of socket | Connection strength predictor |
| Total length | All | Tip of head to end of handle | Ergonomics and packaging |
| Weight | All | Total tool weight | Balance, shipping cost, user fatigue |
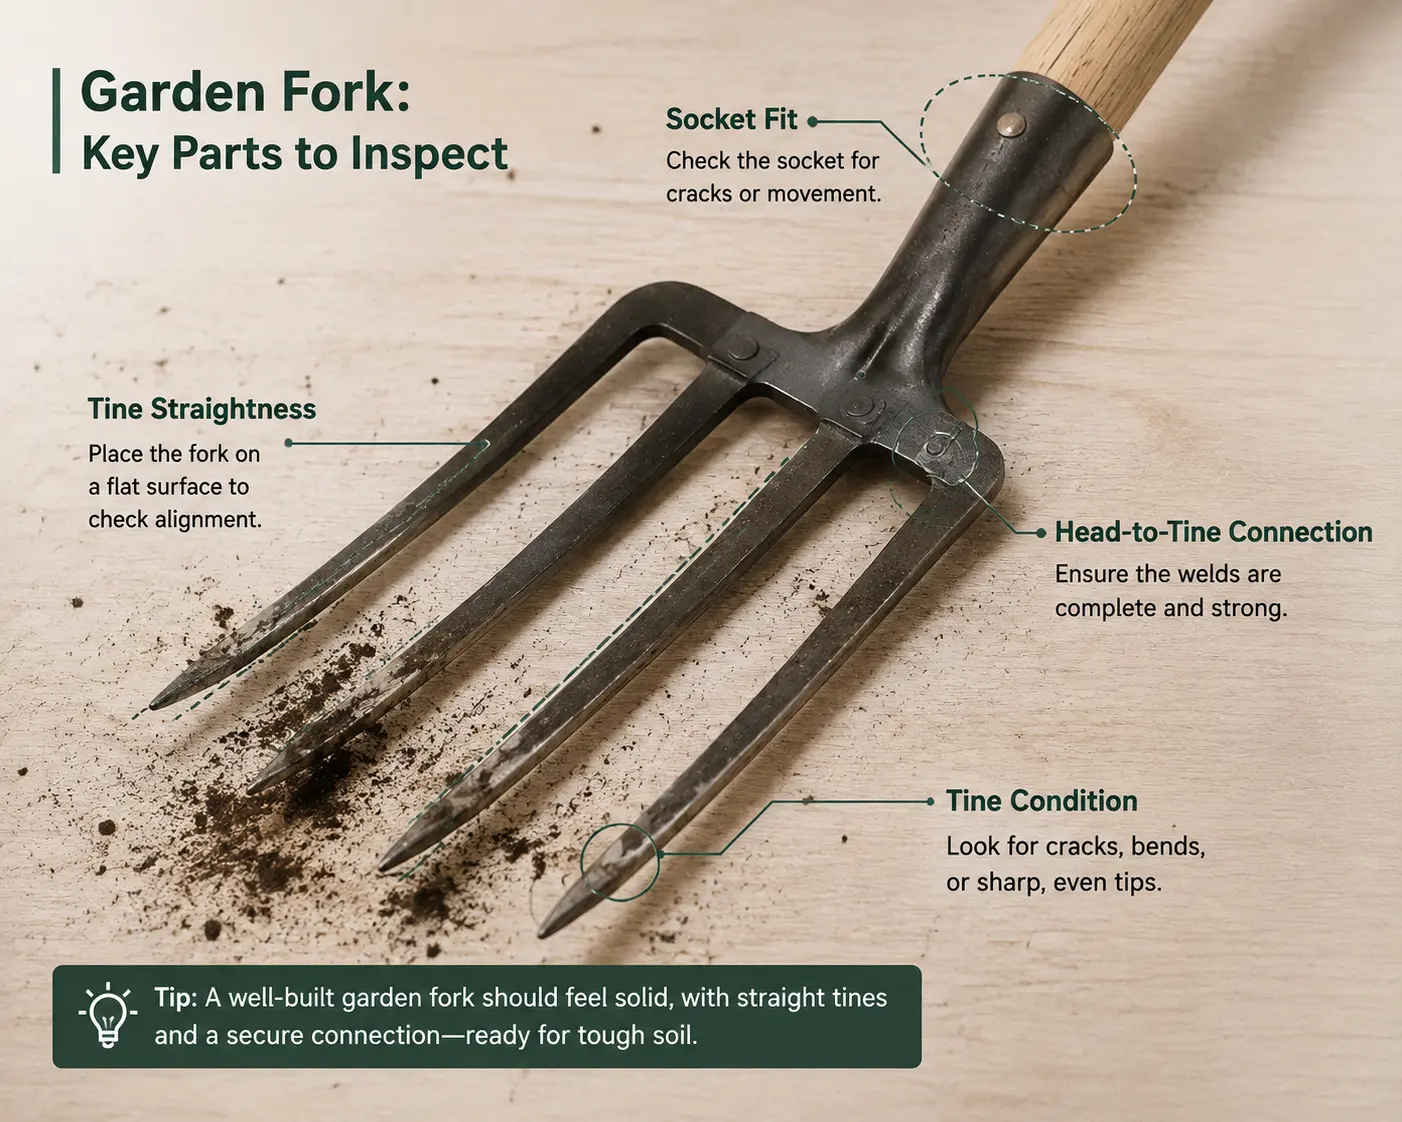
Visual Checks
- Tine alignment (all tines in the same plane)
- Blade flatness (no visible warping)
- Coating coverage (especially edges and tips)
- Handle straightness
- Fastener flushness (rivet or bolt head not protruding)
- Surface defects (burrs, weld spatter, coating runs)
Document these with photos and measurements before testing. If a tool fails a functional test, the baseline helps determine whether the failure was due to a dimensional issue or a material issue.
Static Load and Permanent Deformation Tests
What It Tests
Whether the tool head (blade, tine, or rake head) permanently deforms under a defined load. This is the most common functional test for shovels, forks, and rakes.
How to Set It Up
| Parameter | What to Define |
| Fixture | How the tool is held — by the handle, by the socket, or by the head |
| Load point | Where the force is applied — blade tip, tine tip, or rake head center |
| Direction | Bending, prying, or impact — and in which direction |
| Load magnitude | How much force (in kg or N) |
| Duration | How long the load is held (seconds or minutes) |
| Measurement | Before and after — measure deflection and permanent set |
| Sample count | How many tools are tested |
| Evidence format | Photos, video, measurement table |
What the Results Tell You
- No permanent deformation: The tool withstood the defined load. This does not mean it will never fail — it means it passed this test at this load.
- Permanent deformation within tolerance: The tool bent but returned to within an agreed tolerance. This may be acceptable for some applications.
- Permanent deformation beyond tolerance: The tool bent beyond the agreed limit. This indicates the construction is not adequate for the specified load.
- Fracture: The tool broke. This indicates either the material is too brittle or the load exceeds the design intent.
BS 3388 Reference
BS 3388 provides standardized requirements and test methods for forks, shovels, and spades. It is a formal standard — the full text must be purchased or accessed through a laboratory. If you need formal compliance verification, reference BS 3388 and arrange testing through a laboratory that holds the standard. Do not describe a field test as “BS 3388 testing” unless it is performed to the standard’s full requirements by a qualified party.
Tine and Rake Tooth Bending and Recovery
What It Tests
Whether fork tines or rake teeth bend under load and whether they recover (spring back) or permanently deform.
Test Setup
Fix the head — clamp the fork or rake head securely
Apply load to a single tine — at a defined point (typically the tip) in a defined direction (typically perpendicular to the tine axis)
Measure deflection — how far the tine moves under load
Remove load — and measure permanent set (how far the tine remains bent)
Repeat — for multiple tines to check consistency
What the Results Tell You
| Result | Possible Interpretation |
| Tine bends and returns fully | Elastic deformation — tine is within its design capacity |
| Tine bends and partially returns | Some permanent set — material may be too soft or heat treatment inadequate |
| Tine bends and stays bent | Full permanent deformation — material too soft for the load |
| Tine snaps without significant bending | Brittle fracture — material too hard or tine root has stress concentration |
Important Note
A single tine test tells you about that tine on that sample. To assess batch consistency, test multiple tines on multiple samples. A consistent pattern of bending at the same load across samples indicates a design characteristic. Random variation suggests manufacturing inconsistency.
Connection Pull-Out, Torsion, and Impact Tests
What It Tests
Whether the head-to-handle connection withstands pulling, twisting, and impact — the three forces that cause loose heads.
| Test | What It Simulates | Setup |
| Pull-out | Handle being pulled out of socket during use | Fix head; apply axial pull force to handle; measure force at which connection fails or displaces |
| Torsion | Twisting force on the handle during use (e.g., turning a fork in soil) | Fix head; apply torque to handle; measure angle of rotation and any permanent displacement |
| Impact | Sudden force on the handle or head (e.g., striking a root or rock) | Fix one end; apply defined impact to the other; check for fastener loosening, socket deformation, or handle damage |
Acceptance Criteria
Pull-out force, torque values, and impact energy must be agreed between buyer and supplier. Do not copy another brand’s published values — their tool may have a different construction. Define the test based on your tool’s intended use and expected service conditions.
Coating Adhesion, Thickness, and Hardness Tests
ASTM D3359: Tape Adhesion Test
This is the most accessible coating test for garden tools. It involves:
Cutting a cross-hatch pattern into the coating
Applying adhesive tape over the cuts
Removing the tape and inspecting how much coating was removed
Rating the adhesion on a scale from 0 (worst) to 5 (best)
What it tells you: Whether the coating is bonded to the steel surface. Poor adhesion means the coating will peel under mechanical stress or impact.
What it does not tell you: How long the coating will last outdoors. Adhesion is necessary but not sufficient for long-term performance.
Important: A field-level tape test can be performed on samples without laboratory equipment. But describing it as “ASTM D3359 testing” requires following the standard’s full procedure. A simplified version should be described as a “tape adhesion check based on ASTM D3359 principles.”
Coating Thickness
Coating thickness can be measured with a magnetic gauge (for ferrous substrates). Powder coating is typically thicker than liquid paint — powder coatings commonly range from 60 to 120 microns, while liquid paint may be 20 to 40 microns. Thicker coating generally provides better edge coverage and corrosion resistance, but thickness alone does not guarantee performance.
Impact and Hardness
Coating hardness and impact resistance can be tested through:
- Pencil hardness test: Determines the hardest pencil that does not scratch the coating
- Impact test: A weighted dart is dropped from a defined height onto the coated surface; the coating is inspected for cracking or delamination
These tests are typically arranged through a laboratory if formal results are needed.
Salt Spray Testing: ASTM B117
What It Is
ASTM B117 is a standardized test procedure that exposes coated samples to a controlled salt fog environment. It is the most widely referenced corrosion test for coated steel products.
What It Tells You
ASTM B117 tells you how the coating performs in a specific, standardized corrosive environment. It allows comparison between different coatings or between coated and uncoated samples.
What It Does Not Tell You
Hours of salt spray exposure do not predict years of outdoor service life. This is the most important limitation to understand. A coating that survives 500 hours of salt spray will not necessarily last 500 hours outdoors — real-world conditions include UV exposure, temperature cycling, mechanical damage, and varying humidity that salt spray does not replicate.
How to Use It
- Use B117 as a comparison tool: “Coating A survived 500 hours; Coating B survived 200 hours” — this tells you A is more corrosion-resistant in this test.
- Do not use B117 as a lifetime predictor: “This coating will last X years outdoors” — this is not a valid claim.
- Do not describe a field test as “salt spray testing” — B117 requires specific equipment and procedures.
Packaging Transit Tests: ISTA Procedures
Why Packaging Testing Matters for Garden Tools
Long-handled garden tools are among the most challenging products to package:
- Length: 1,200–1,500 mm handles require long cartons that are vulnerable to bending
- Weight concentration: The head is heavier than the handle, creating an unbalanced load
- Sharp edges: Tine tips and blade edges can puncture packaging and damage adjacent tools
- Head-to-head contact: Multiple heads in one carton can impact each other, chipping coatings and deforming sockets
ISTA Test Procedures
The International Safe Transit Association (ISTA) provides standardized packaging test procedures. ISTA procedures are selected based on the shipping method:
| Shipping Method | Likely ISTA Procedure | What It Tests |
| Parcel (small package) | ISTA 3A | Drop, vibration, and impact resistance of individual packages |
| LCL (less-than-container load) | ISTA 3A or 3E | Drop, vibration, and compression |
| FCL (full container load) | ISTA 3E or 3F | Pallet or container load stability, vibration, and impact |
What to Test
- Drop test: Carton dropped from a defined height in multiple orientations — check for head damage, handle bending, and coating chips
- Vibration test: Carton vibrated on a test platform for a defined duration — check for fastener loosening and head-to-head impact
- Compression test: Carton stacked and compressed — check for carton collapse and tool damage
Practical Approach
If formal ISTA testing is not available, a simplified field test can identify obvious packaging issues:
Pack the tools as they will be shipped
Drop the carton from waist height in 6 orientations (each face, each edge, each corner)
Open and inspect for damage
Vibrate the carton on a vehicle for a defined distance
Inspect again
This does not replace ISTA testing, but it can identify whether packaging is clearly inadequate before committing to a shipment.
Sample Quantity, Documentation, and Repeatability
How Many Samples to Test
| Purpose | Sample Quantity | Why |
| Initial sample approval | 1–2 per model | Confirm the model meets specification |
| Batch verification | 3–5 per model (or per agreed AQL) | Check consistency across production |
| Corrective action verification | 3–5 of the corrected batch | Confirm the fix worked |
| Formal compliance testing | As required by the standard | Standard specifies sample quantity |
Documentation Requirements
Every test should produce:
- Test plan: What was tested, how, and what the acceptance criteria are
- Before photos and measurements: Baseline condition
- Test video or photos: The test being performed
- After photos and measurements: Post-test condition
- Results: Pass/fail against acceptance criteria
- Deviations: Any deviations from the test plan and why
- Conclusions: What the results mean for the specification
Repeatability
A test is repeatable when:
- The fixture, load point, direction, and duration are defined
- Another person could perform the same test and get comparable results
- The sample preparation is documented (what condition was the tool in before testing)
If a test cannot be repeated, its results cannot verify a specification. “We tried it and it seemed okay” is not a test result — it is an impression.
How to Write Test Results into Specifications
Test results are only valuable if they feed back into procurement documents:
| Test Result | Specification Update |
| Tine bends at 3 kg load; acceptance was 5 kg | Specify tine cross-section and/or heat treatment to meet 5 kg requirement |
| Socket pulls out at 20 kg; acceptance was 50 kg | Specify longer socket, larger fastener, or through-bolt |
| Coating fails ASTM D3359 at rating 2; acceptance was 4 | Specify powder coating with proper surface preparation |
| Carton fails drop test at 60 cm | Specify stronger carton, internal dividers, or head protection |
| All samples pass at defined criteria | Lock the specification — do not allow changes without re-testing |
EU General Product Safety Regulation (GPSR) Context
For buyers supplying the EU market, Regulation (EU) 2023/988 (General Product Safety Regulation) establishes a framework for product safety that may require documentation of risk analysis and technical evidence. While this regulation is broad and applies to many product categories, garden tool buyers should be aware that:
- Safety documentation may be requested by market surveillance authorities
- Risk analysis should consider foreseeable use — including misuse
- Technical documentation should include test evidence where available
This does not mean every garden tool needs formal GPSR certification. It means that having documented test evidence — even field-level evidence — is better than having none. Consult a compliance specialist for market-specific requirements, as regulatory details should be verified against the official source before publication.
FAQ
Do I need to test every tool I order? No. Testing is typically performed on samples — not on full production batches. The purpose is to verify that the specification is achievable and that the factory can produce to it consistently. After sample approval, QC inspections (visual and measurement checks) are used for batch verification.
Can I use a simple field test instead of formal laboratory testing? For initial sample evaluation and comparative testing, yes. A field test that applies a defined load to a defined point and documents the result is useful for decision-making. However, it should not be described as “standardized testing” or “certified” unless it follows the full published procedure. Use field tests for internal decisions; use standardized tests for compliance and formal evidence.
What does “passed salt spray testing” actually mean? It means the coated sample survived exposure to a standardized salt fog environment for the stated duration without exceeding the agreed failure criterion (typically a percentage of surface rust). It does not mean the coating will last that long outdoors. Salt spray is a comparison tool, not a lifetime predictor.
How do I agree on acceptance criteria if I don’t have engineering data? Start with the use case. What force will the tool experience? What is the consequence of failure? A shovel used for daily landscaping needs higher acceptance criteria than one used for light garden work. Discuss with your supply team — they can propose realistic values based on the tool’s construction and intended use. The key is to agree before testing, not after.
Should I require ISTA packaging testing for every order? Not necessarily for every order. But if you have experienced transit damage, or if you are changing packaging configuration (new carton, new pallet pattern, head-only vs. assembled), ISTA testing or a simplified drop test is advisable. For ongoing orders with proven packaging, periodic checks may be sufficient.